[ECW Quals 2020] Android reverse - Antirdroid
Introduction
This challenge was part of the European Cyber Week qualifications.
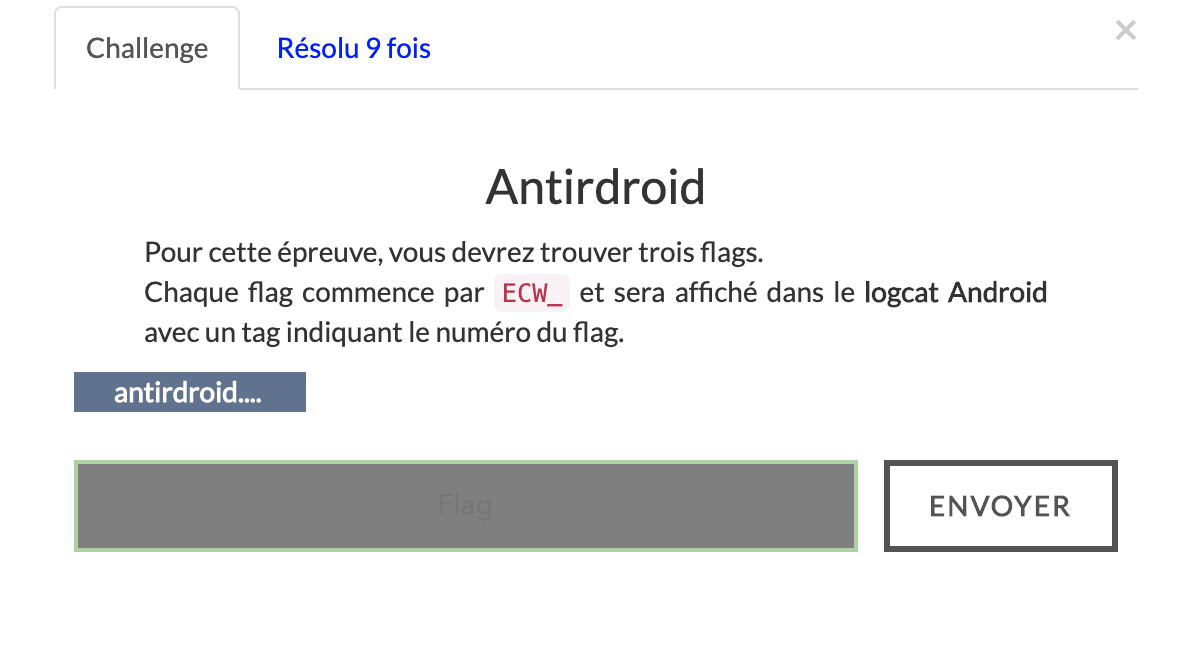
This challenge was composed of 3 flags. These flags progressively appeared in the logcat when passing different steps on the app.
It was a pretty interesting challenge to learn android reversing and a good introduction to frida which I never used before.
Explanation
Getting the foothold
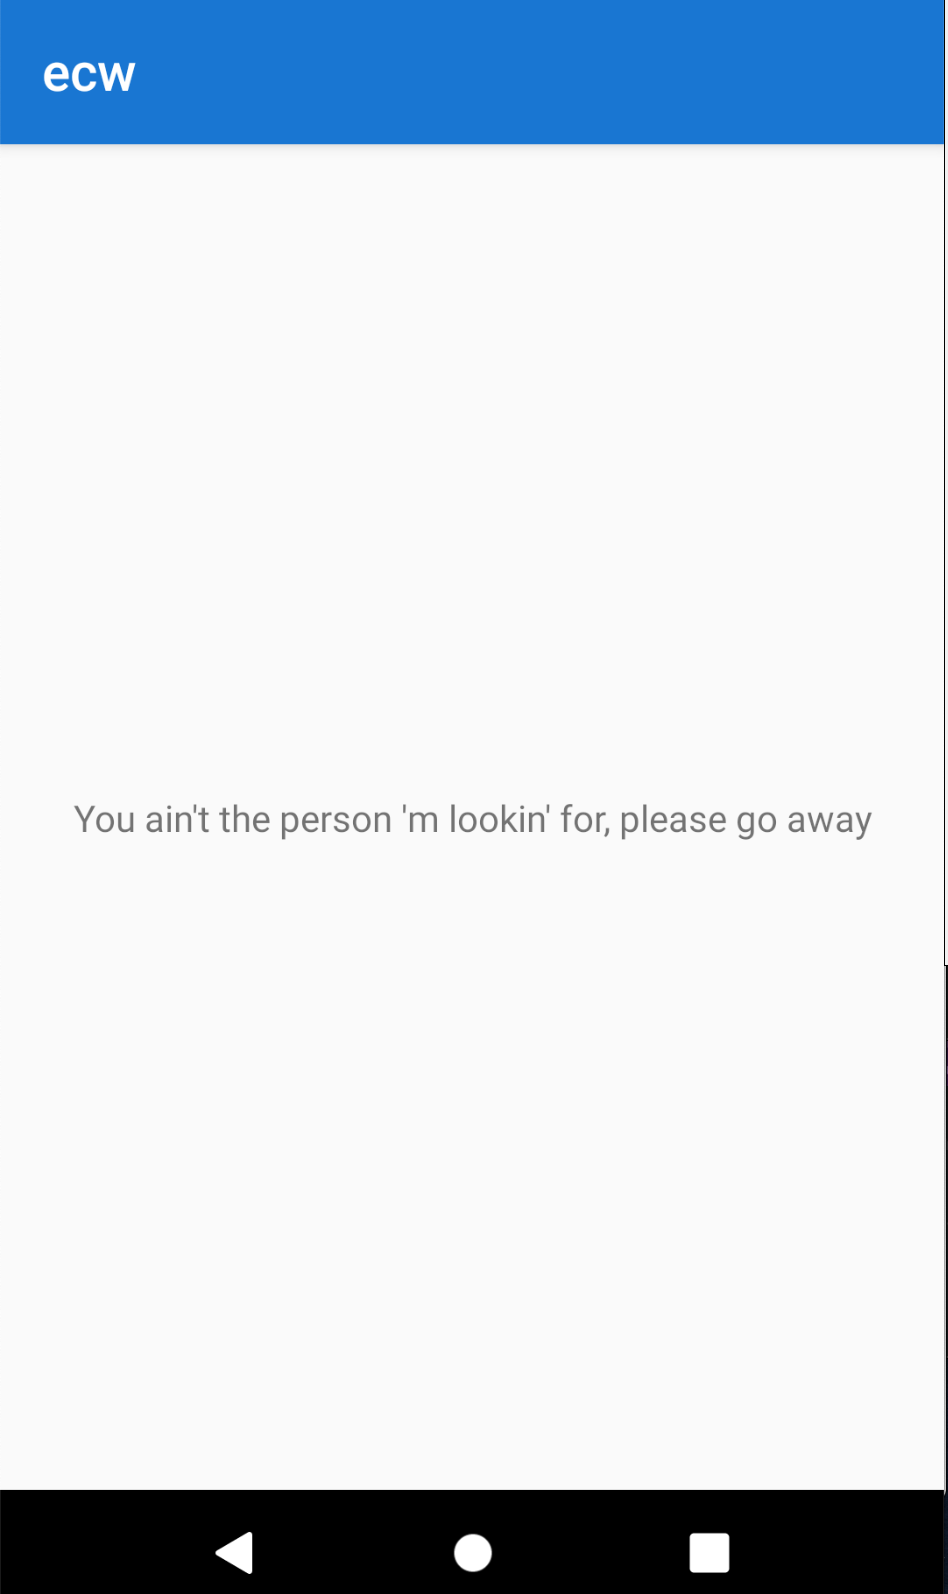
The first thing I did was to install Android Studio. It come with an emulator and ADB so I thought it was the easiest way to run the APK.
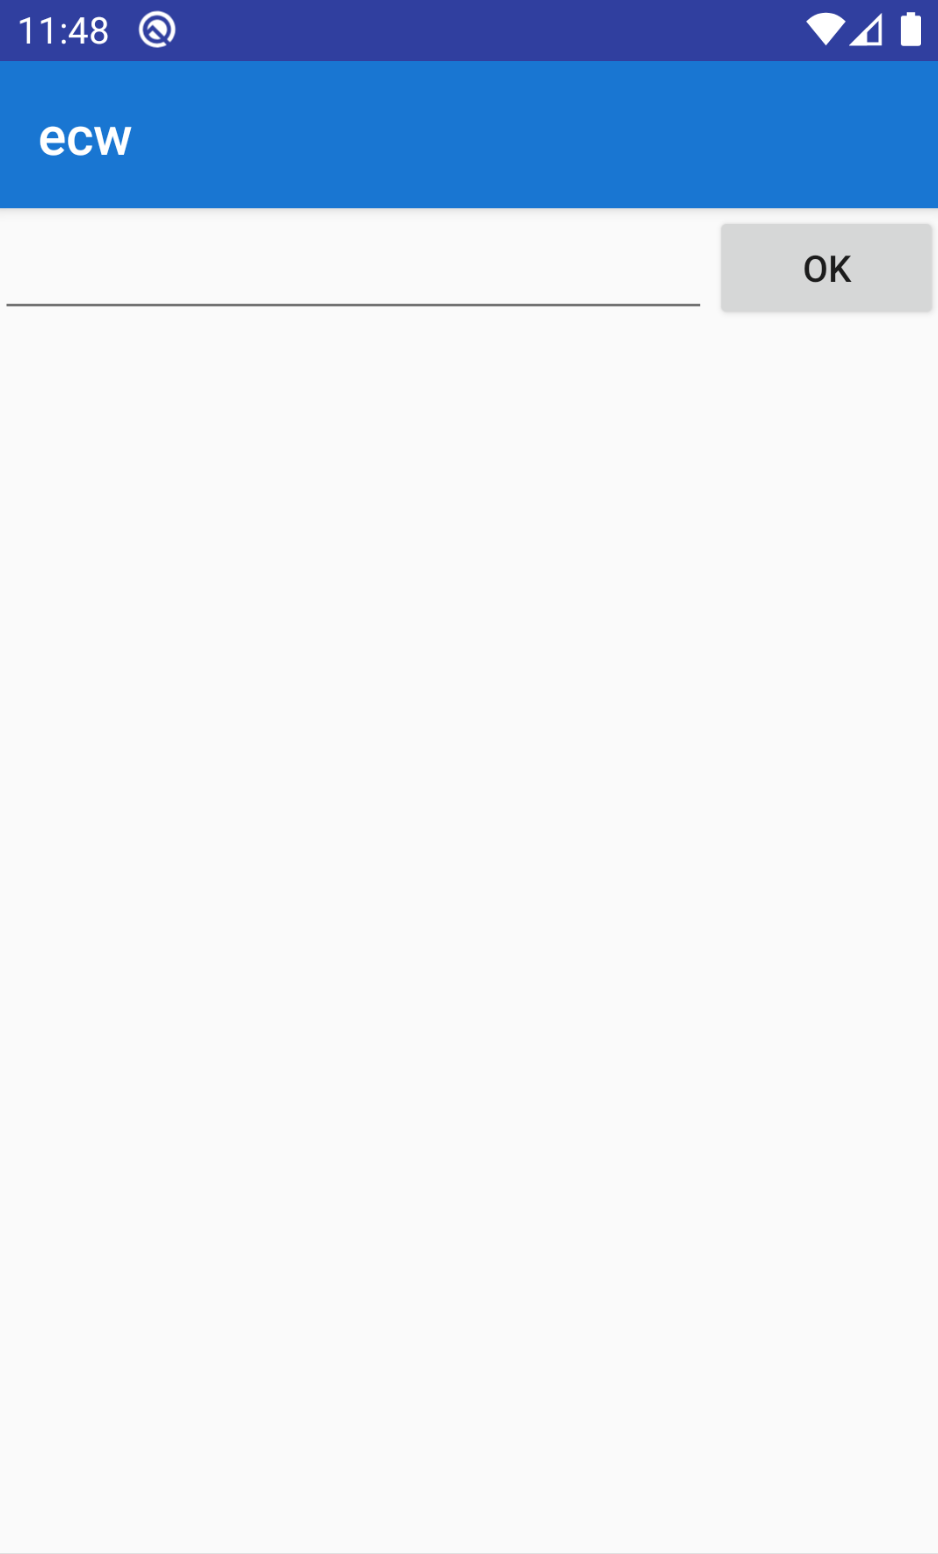
The first app launch gave the following message:
Let’s unpack the APK and decompile the java bytecode. To do this, I used jadx-gui and jd-gui. Indeed, I prefer jd-gui but sometimes the output of jadx-gui might be cleaner.
Jd-gui needs a jar file which we can provide by unzipping the APK file and then using dex2jar tool to convert classes.dex (which contains all the code) to the wanted jar.
Here is the tree view representing the different classes:
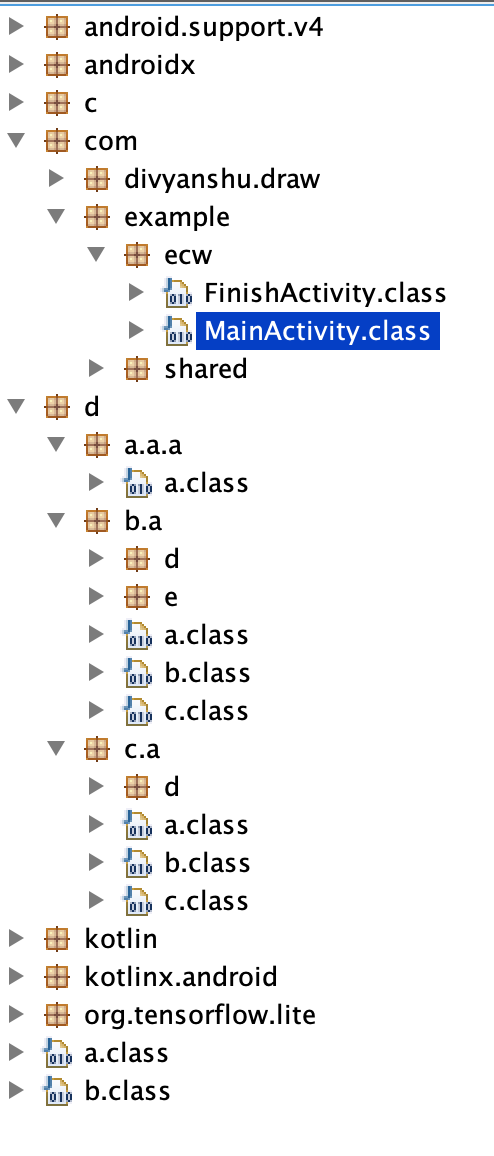
The first thing we should be looking for is the MainActivity onCreate() method because it’s the application entry point. This class is under com.example.ecw.MainActivity.class.

The app is saving 3 files (step_1.dex, step_2.dex, step_3.dex) from the app resources in a folder associated to the app on the device. On my emulator, it was /data/user/0/com.example.com/files.
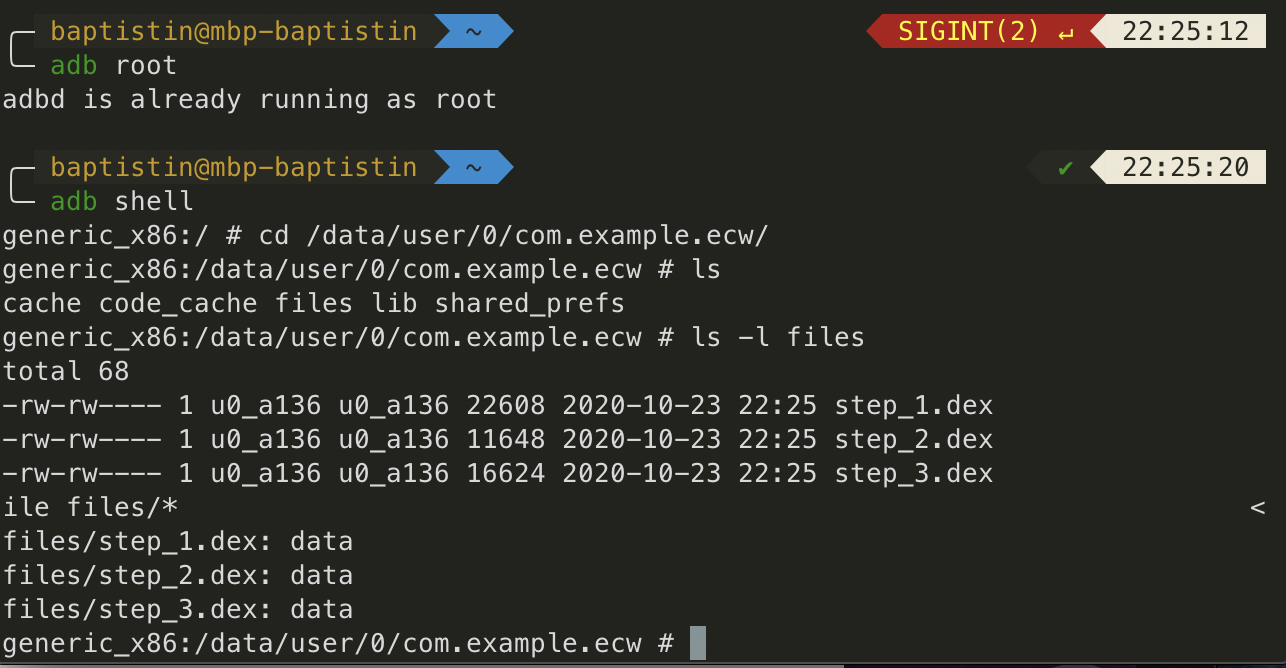
These 3 files should give us access to the 3 flags we’re looking for! However, at this point I wasn’t able do decompile the dex file. The data is unreadable, so maybe it’s kind of encrypted.
Let’s look at other parts of the code in the classes.dex file:
This part creates ContentResolver of ContactsContract.Data and is going to iterate over each entry calling a method invoke() of class d.c.a.b.
Also, don’t forget to check that the read permission is allowed to the app in android settings.
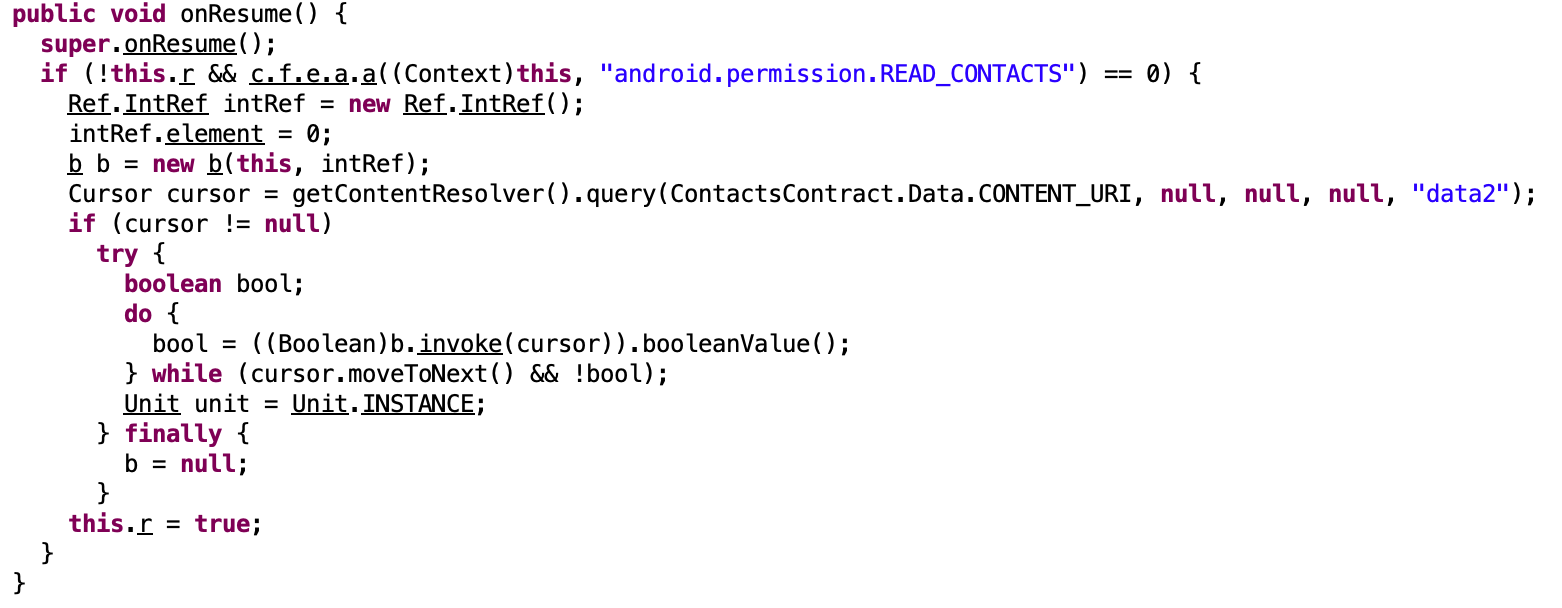
Here’s a part of the method:

Basically, this code is going to extract the data2 column of the contact given by the ContentResolver and check if the MD5 value is equals to b71985397688d6f1820685dde534981b corresponding to “jean”.
It took me a lot of time trying to figure out what data2 column was and how to control it. The only solution I found was to create an app able to insert a new contact with the wanted property.
I struggled a bit because on recent android version you’ve to request the write permission at the runtime. I’ll just show you the useful part and let you google this by yourself.
private fun addContact() {
        val cr = this.contentResolver
        val cv = ContentValues()
        cv.put(ContactsContract.Data.RAW_CONTACT_ID, 1)
        cv.put(ContactsContract.Data.MIMETYPE, "name")
        cv.put(ContactsContract.Data.DATA2, "jean")
        cr.insert(ContactsContract.Data.CONTENT_URI, cv)
}
I then run the app I created and successfully got a “Nice try” which is a little step but meaning I’m moving forward.
Then, the invoke method seems to be calling 3 classes that implements a specific interface.
The code below is checking if the app is running on an emulator.
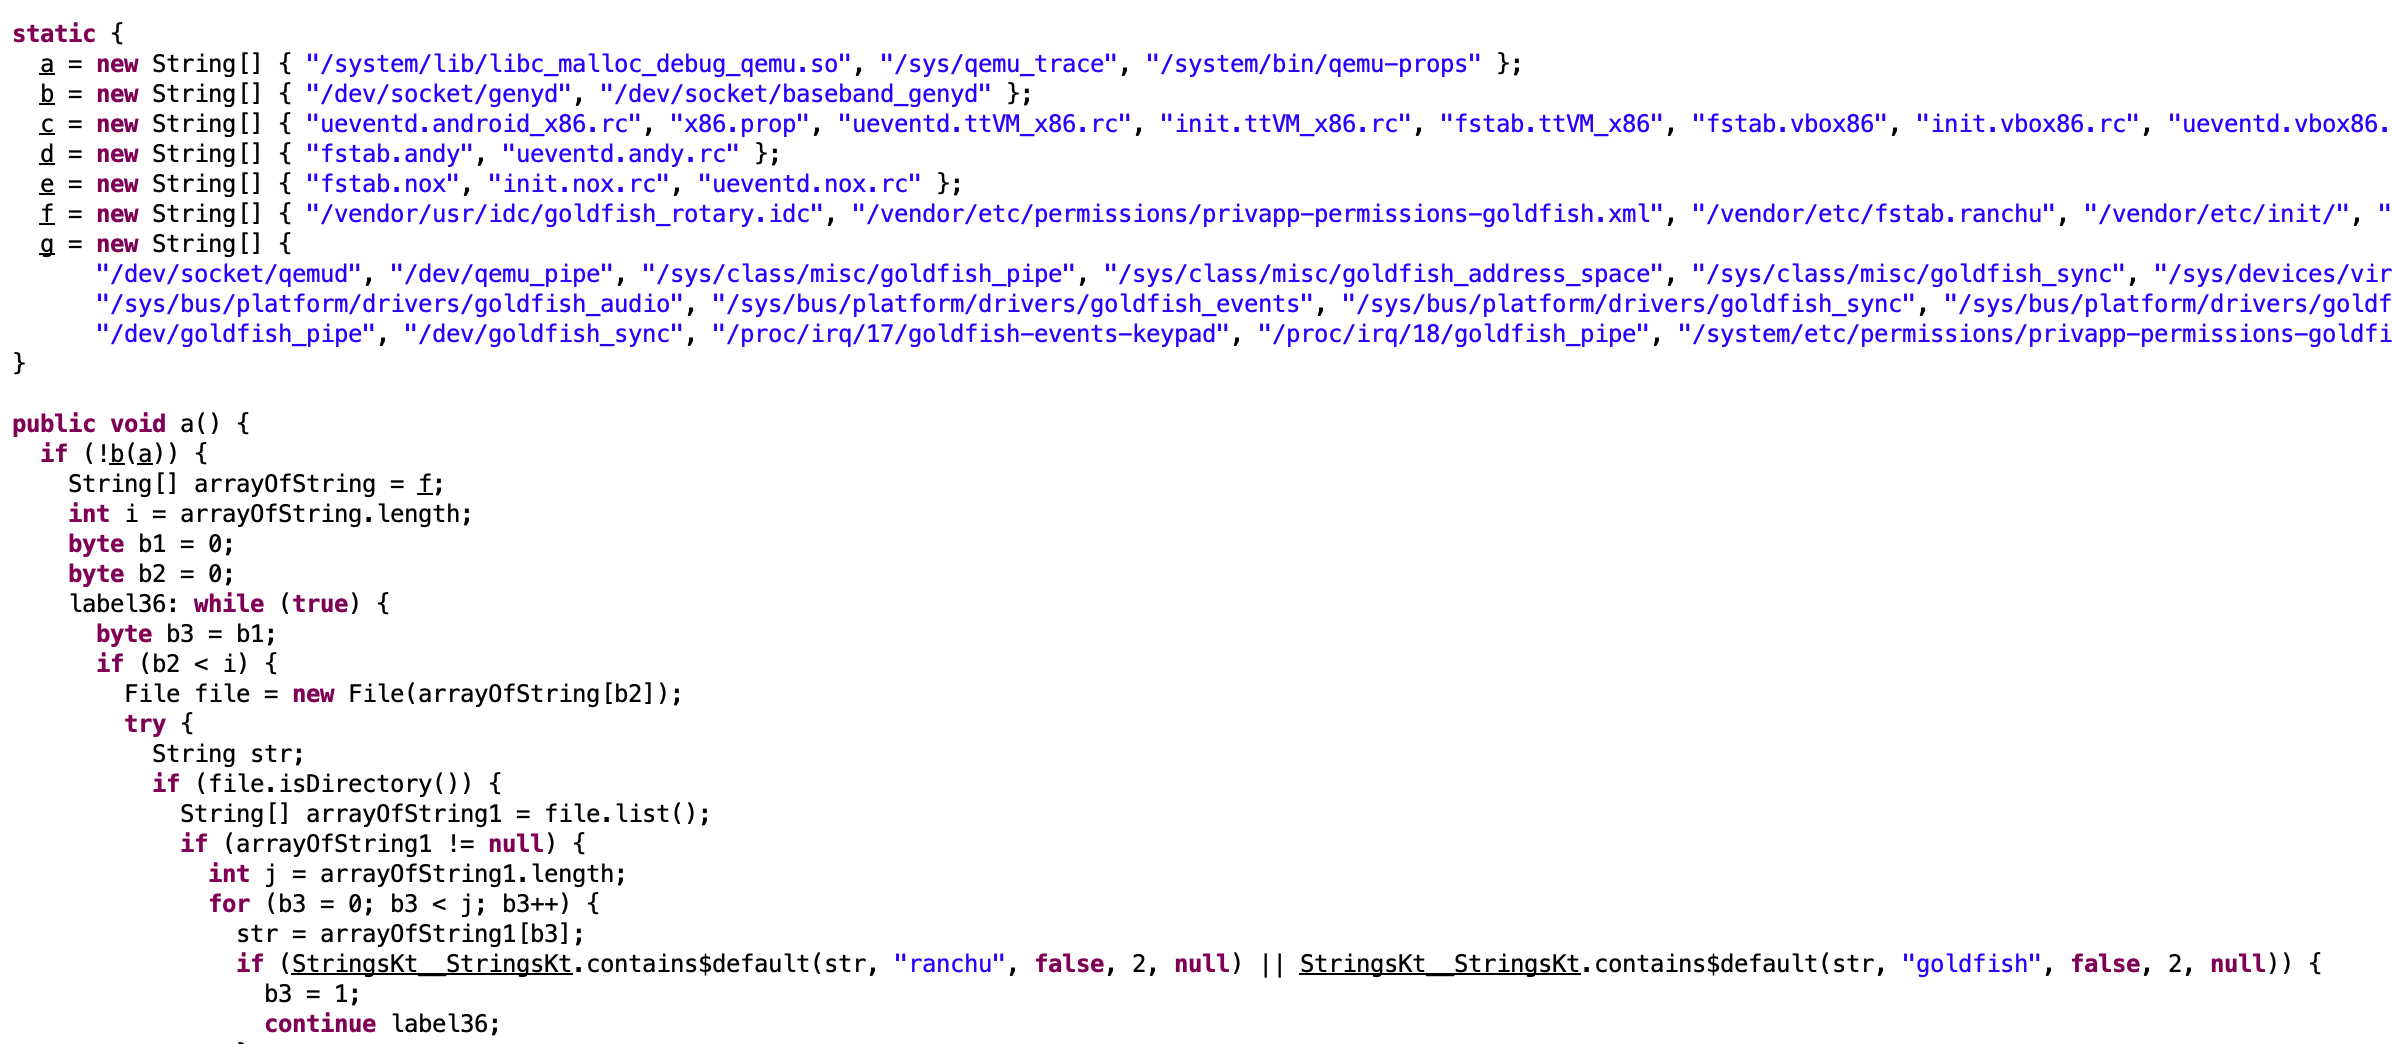
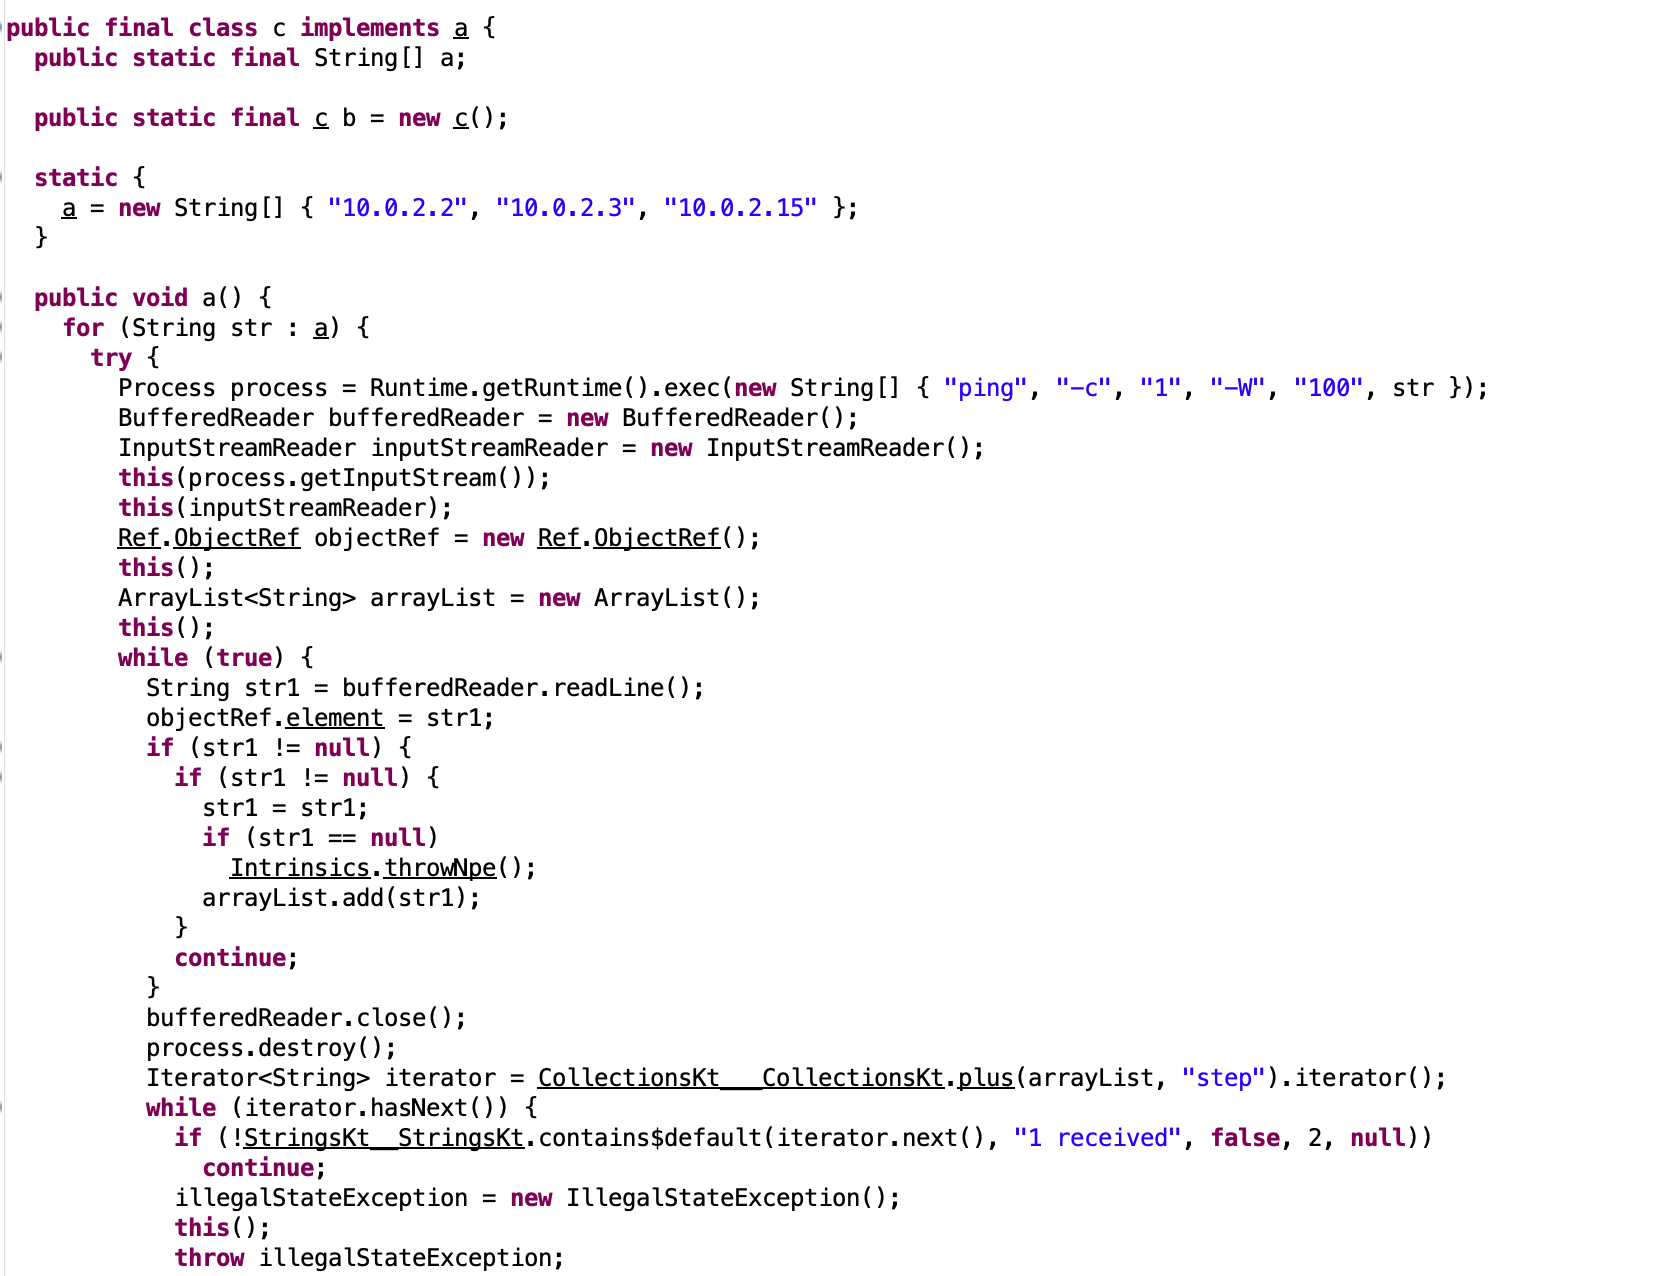
The code below is checking that the 3 IPs are responding to ping.
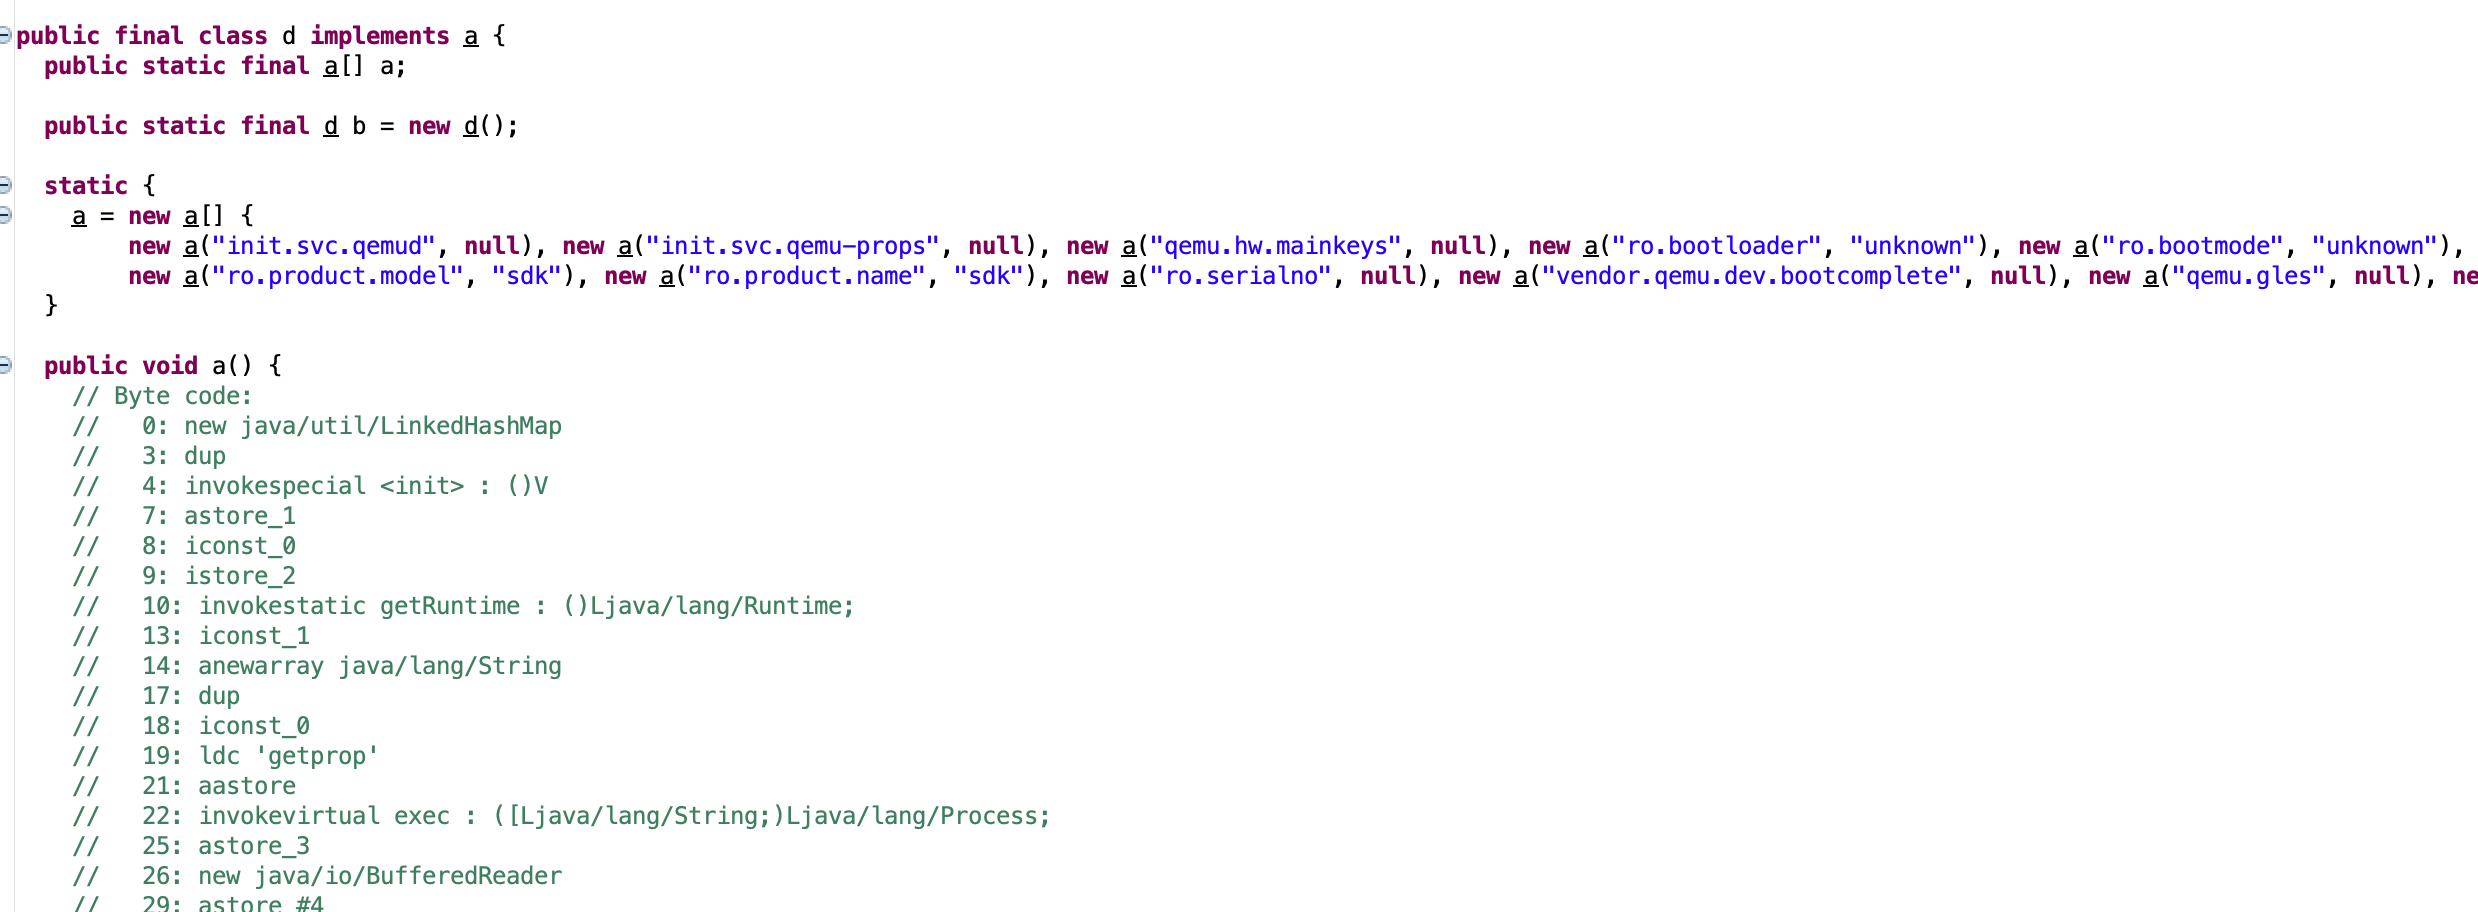
The code below is also doing an emulator check.
Now seem to be a good time to install frida the beast and learn few things.
I never played with this tool before and I have to say that it’s powerful!
These 3 methods seem to be bothering us. But we can just hook them at runtime using frida powers.
Let’s create a javascript file and add these lines to replace the 3 methods by simple console.log calls.
Java.perform(function() {
    var x = Java.use("d.c.a.d.c");
    x.a.implementation = function () {console.log("Bypass c.a() ! :)")};

    var x2 = Java.use("d.c.a.d.b");
    x2.a.implementation = function () {console.log("Bypass b.a() ! :)");

    var x3 = Java.use("d.c.a.d.d");
    x3.a.implementation = function () {console.log("Bypass d.a() ! :)");
}
Then we just start frida-server on the emulator and run the following command to launch our app with the previous script.
frida -U -f com.example.ecw -l antirdroid.js --no-pause
We’re now notified that “We made it to step 1”. It’s going to be a long road…
When all checks are validated, the step_1.dex file is loaded, decrypted using AES with a derivation key using PBKDF2. Then the classes are loaded and a call to this new part of the code is made.
Solving step 1
Now that the step_1 is decrypted and loaded, we want to be able to decompile it using jadx or jd-gui.
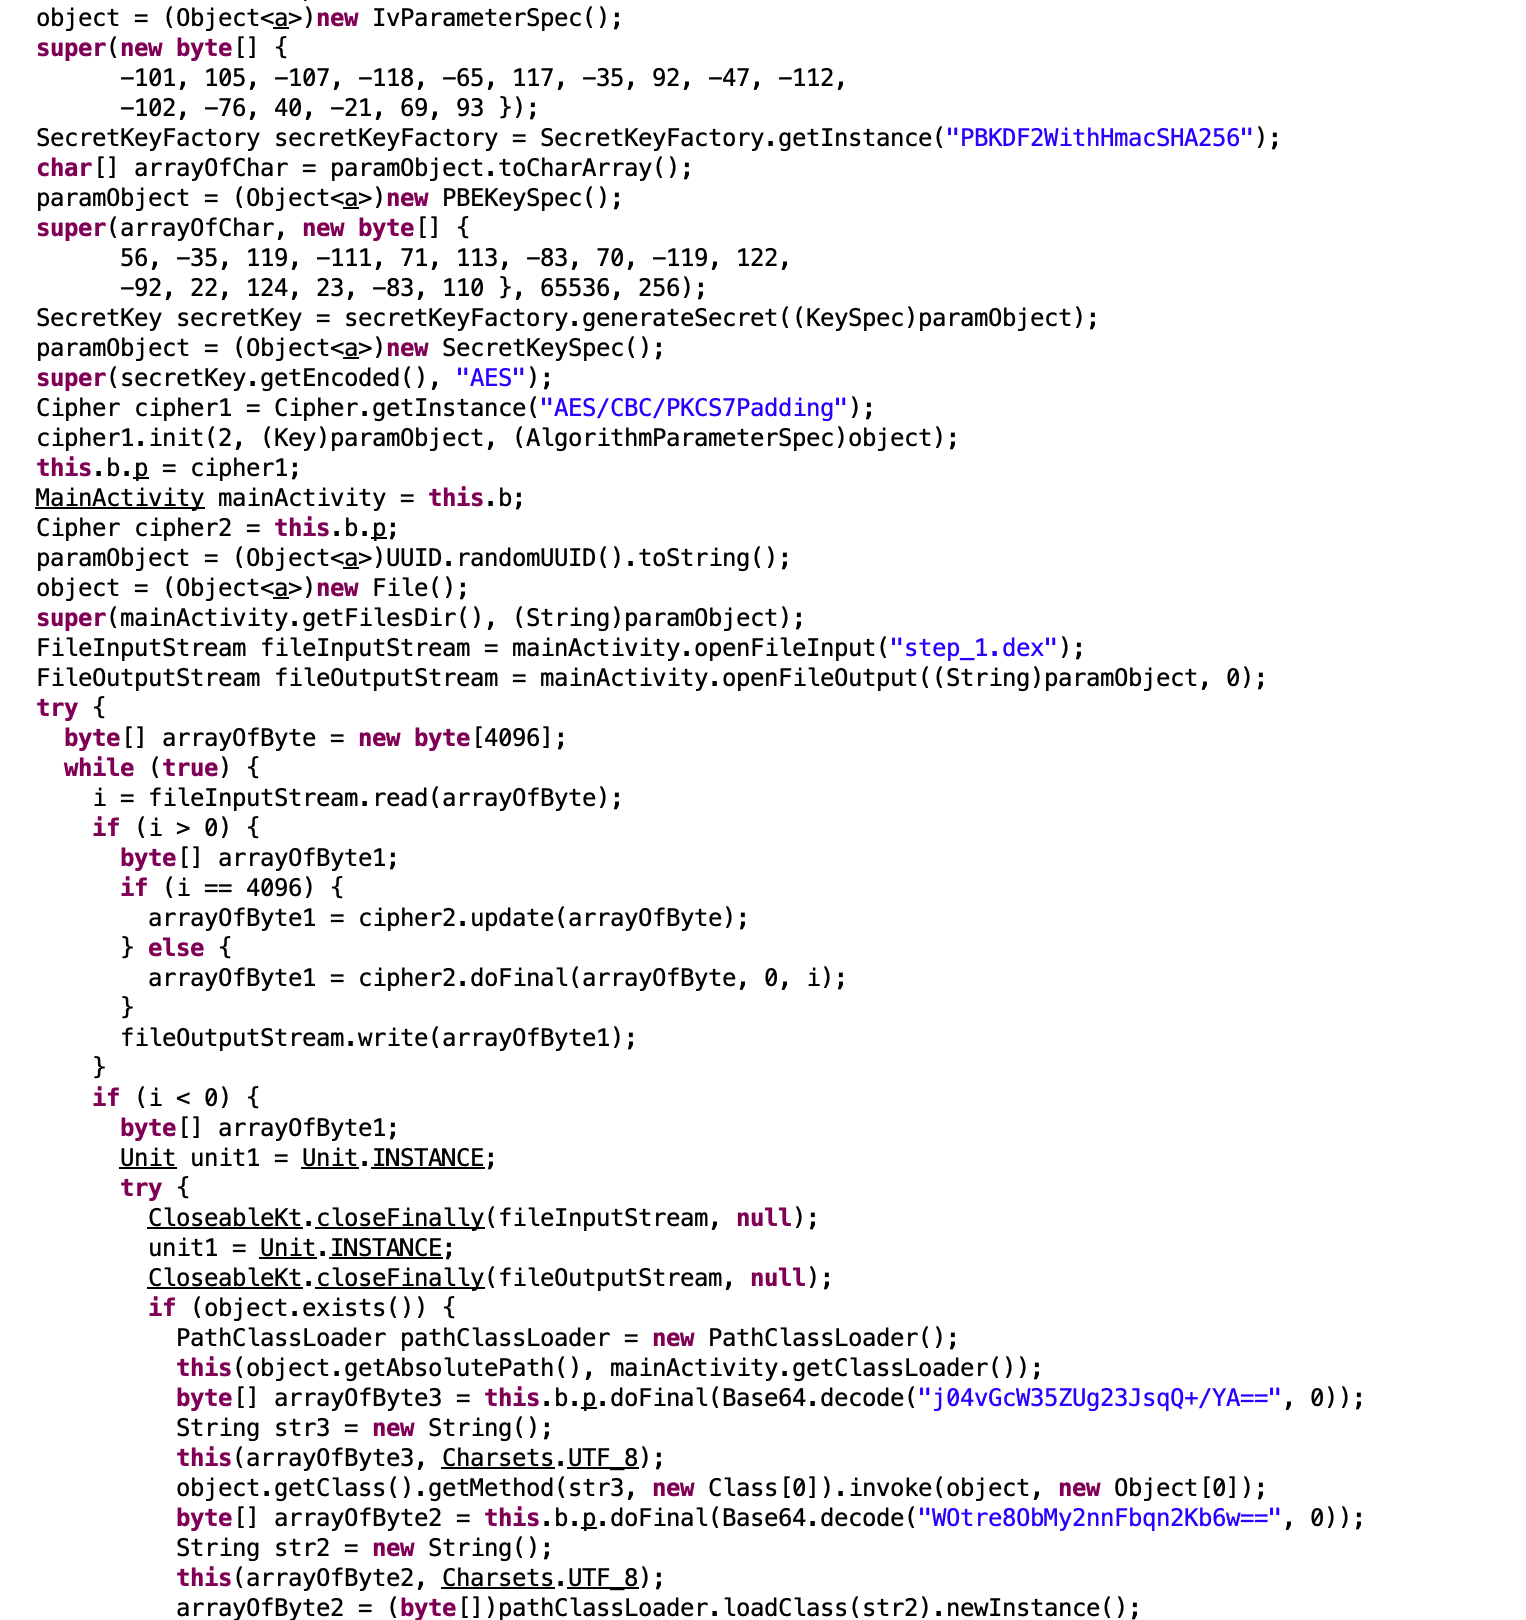
We learn that the step_1.dex decrypted is stored in /data/user/0/com.example.ecw/files where the filename is a generated UUID.
However, when the class is loaded, the file is removed. I firstly tried to copy all UUID named files in a backup directory using a bash command with a while but it was too slow so I wasn’t able to catch the file.
I decided to add a hook in frida to stops the file deleting process to avoid the file been removed by the app. To do that, I choose to hook the unlink syscall wrapper of the libc.
Here is the code I used:
Interceptor.attach(Module.findExportByName('libc.so', 'unlink'), {
    onEnter: function (args) {
        const path = Memory.readUtf8String(args[0]);
        if (path.indexOf('/data/user/0/com.example.ecw/files') !== -1) {
            Memory.writeUtf8String(args[0], '/invalid/path');
        }
    }
});

Interceptor.attach(Module.findExportByName("libc.so", "open"), {
    onEnter: function(args) {
        this.path = Memory.readCString(args[0]);
    },
    onLeave: function(ret) {
        console.log("Open file : " + this.path + " -> ret : " + ret.toInt32());
    }
});
The first part checks if the path given to unlink contains /data/user/0/com.example.ecw/files and replaces the path argument by an invalid path if it’s true. The second part is just here to trace open syscall so I’m able to see every file opened.
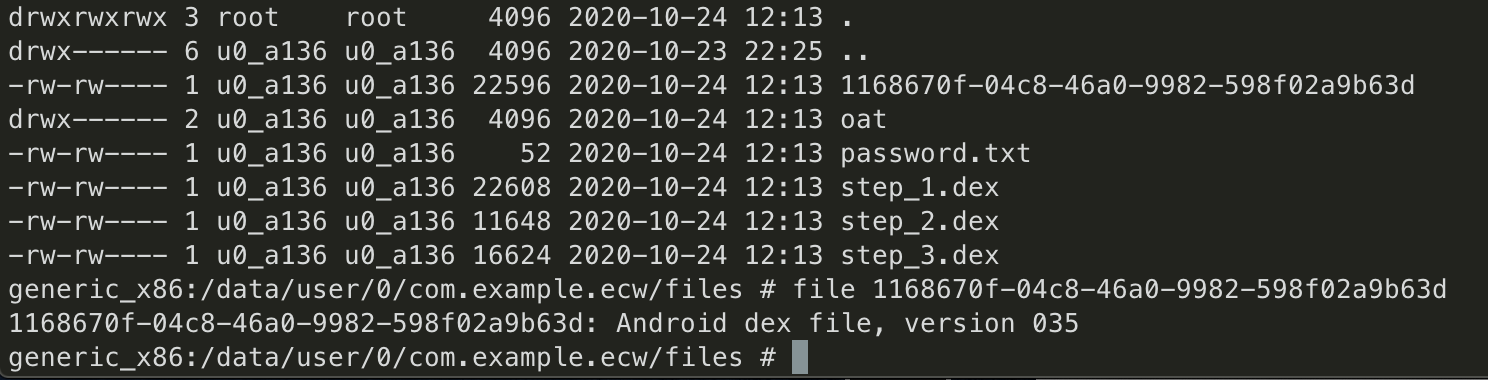
As you can see, we can now successfully recover the decrypted step_1.dex.
Same process, we pull the file, convert it to a jar and open up jd-gui.

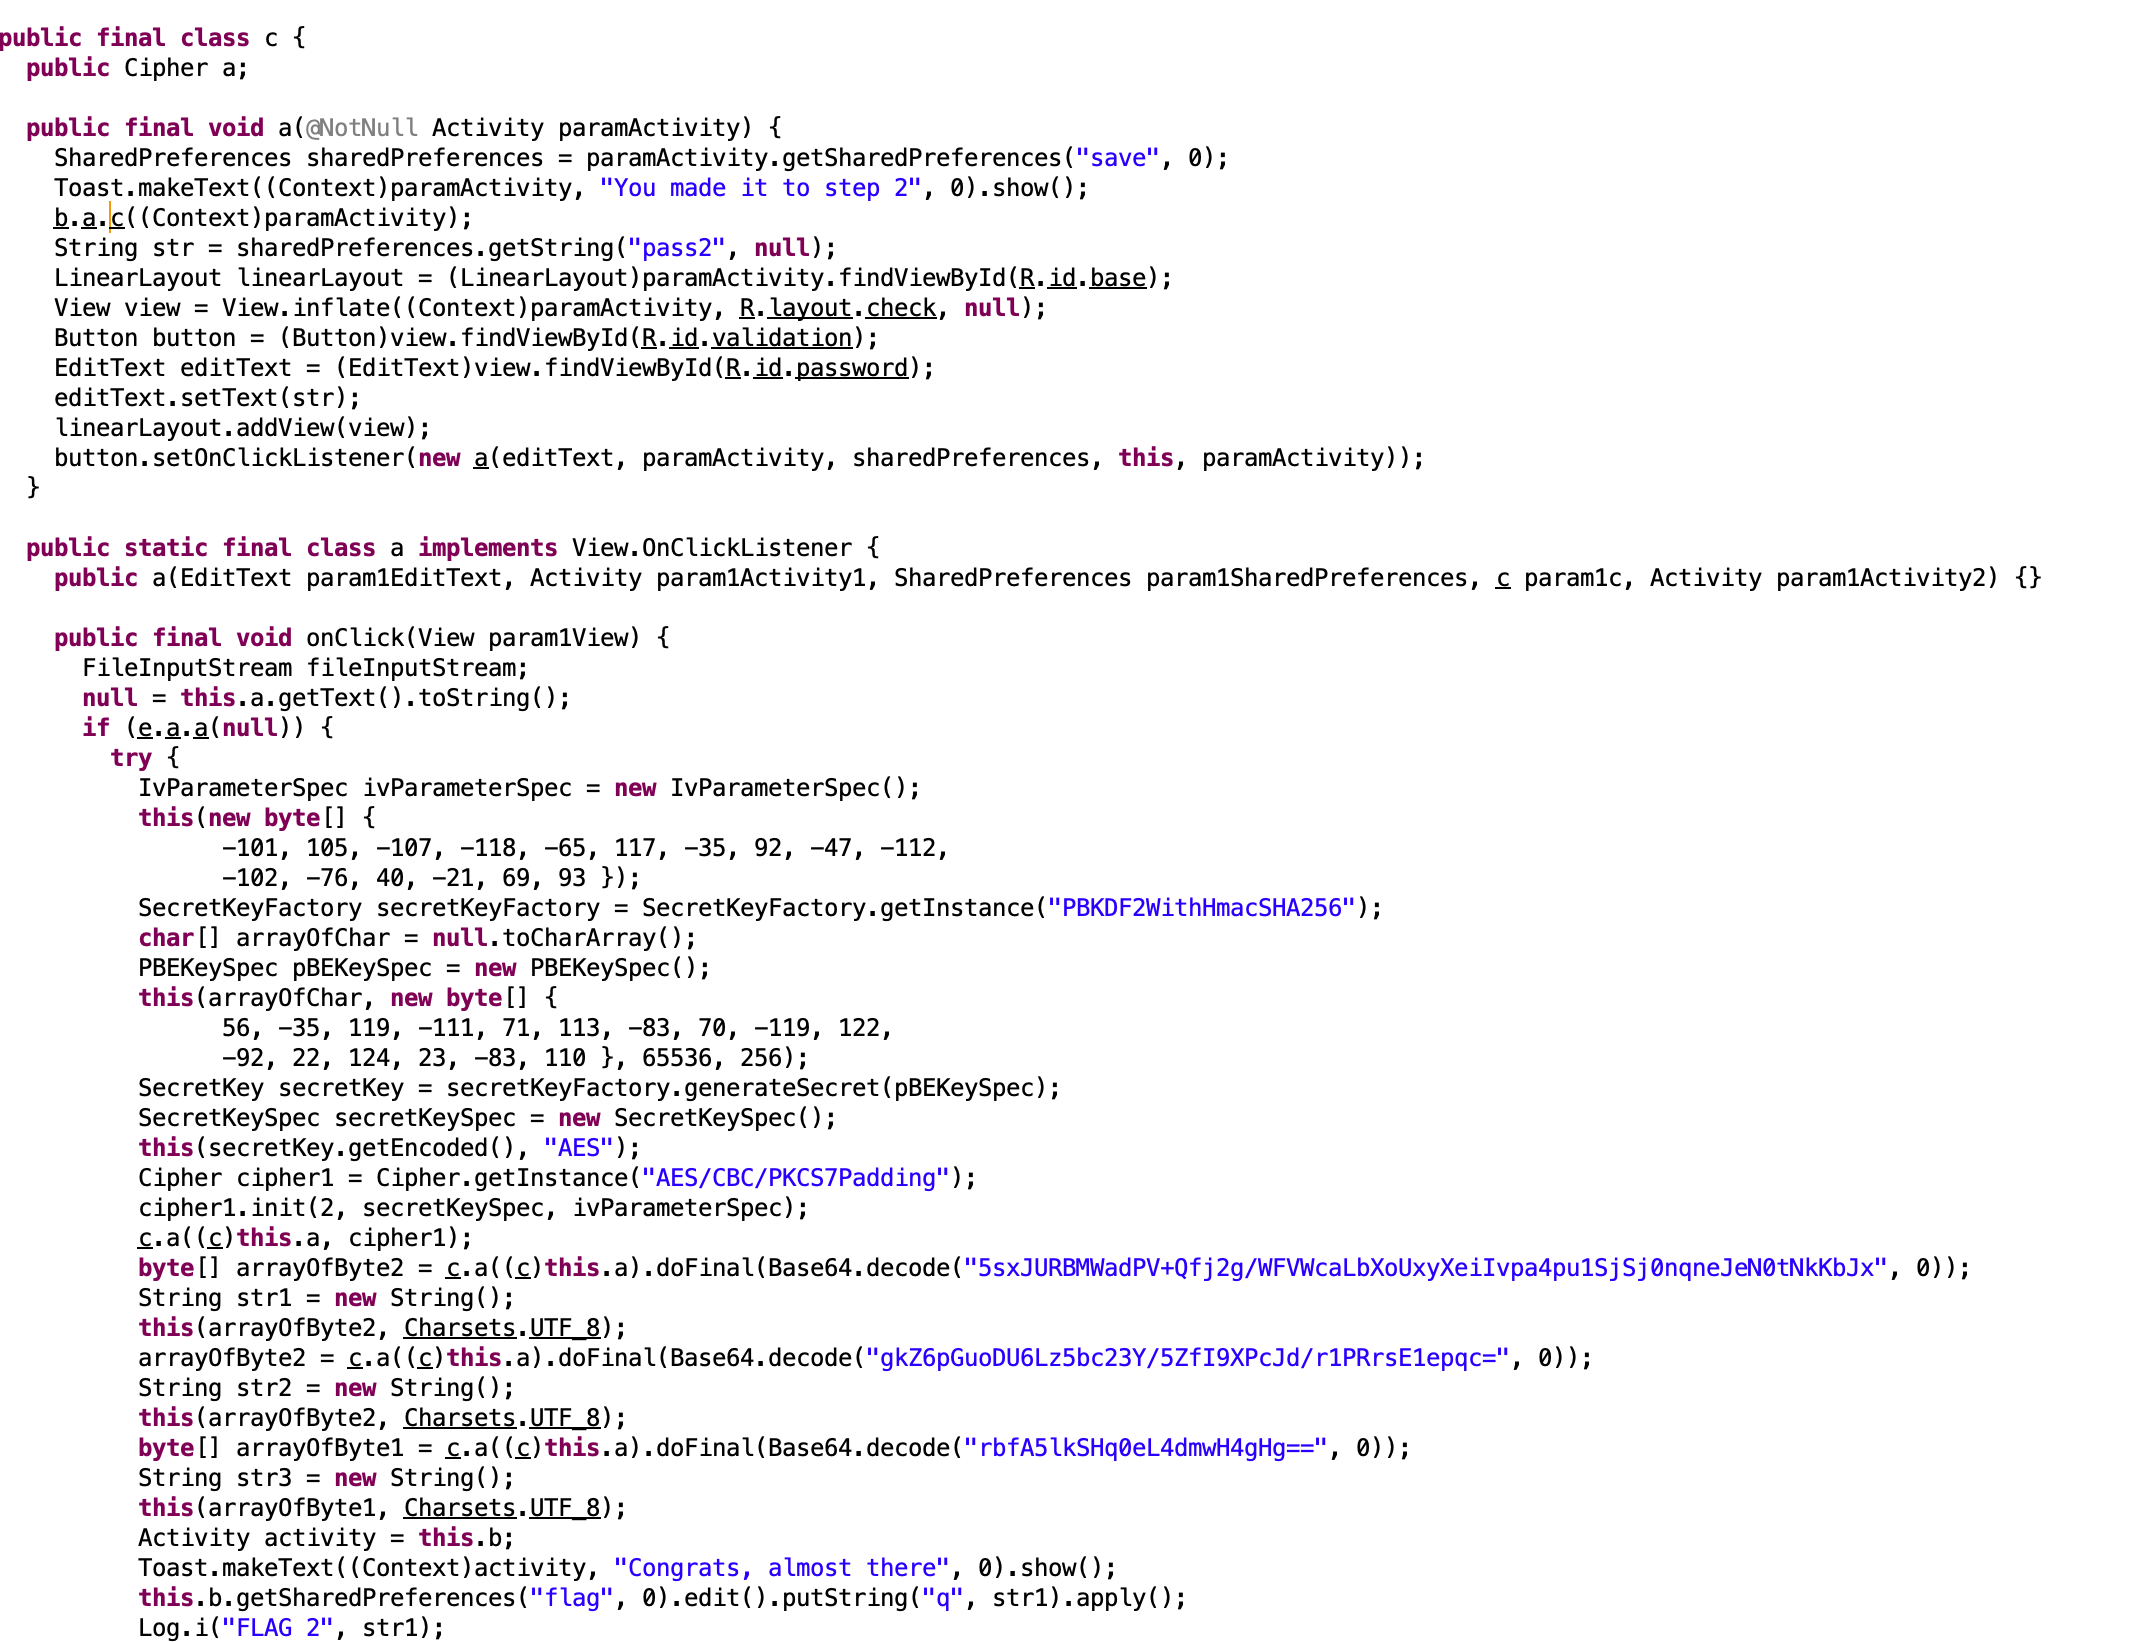
We can see that some SharedPreferences are being edited and a new view is added with a text field and a button.
We also see a static String containing password.txt.
Let’s check the class implementing the OnClickListener:
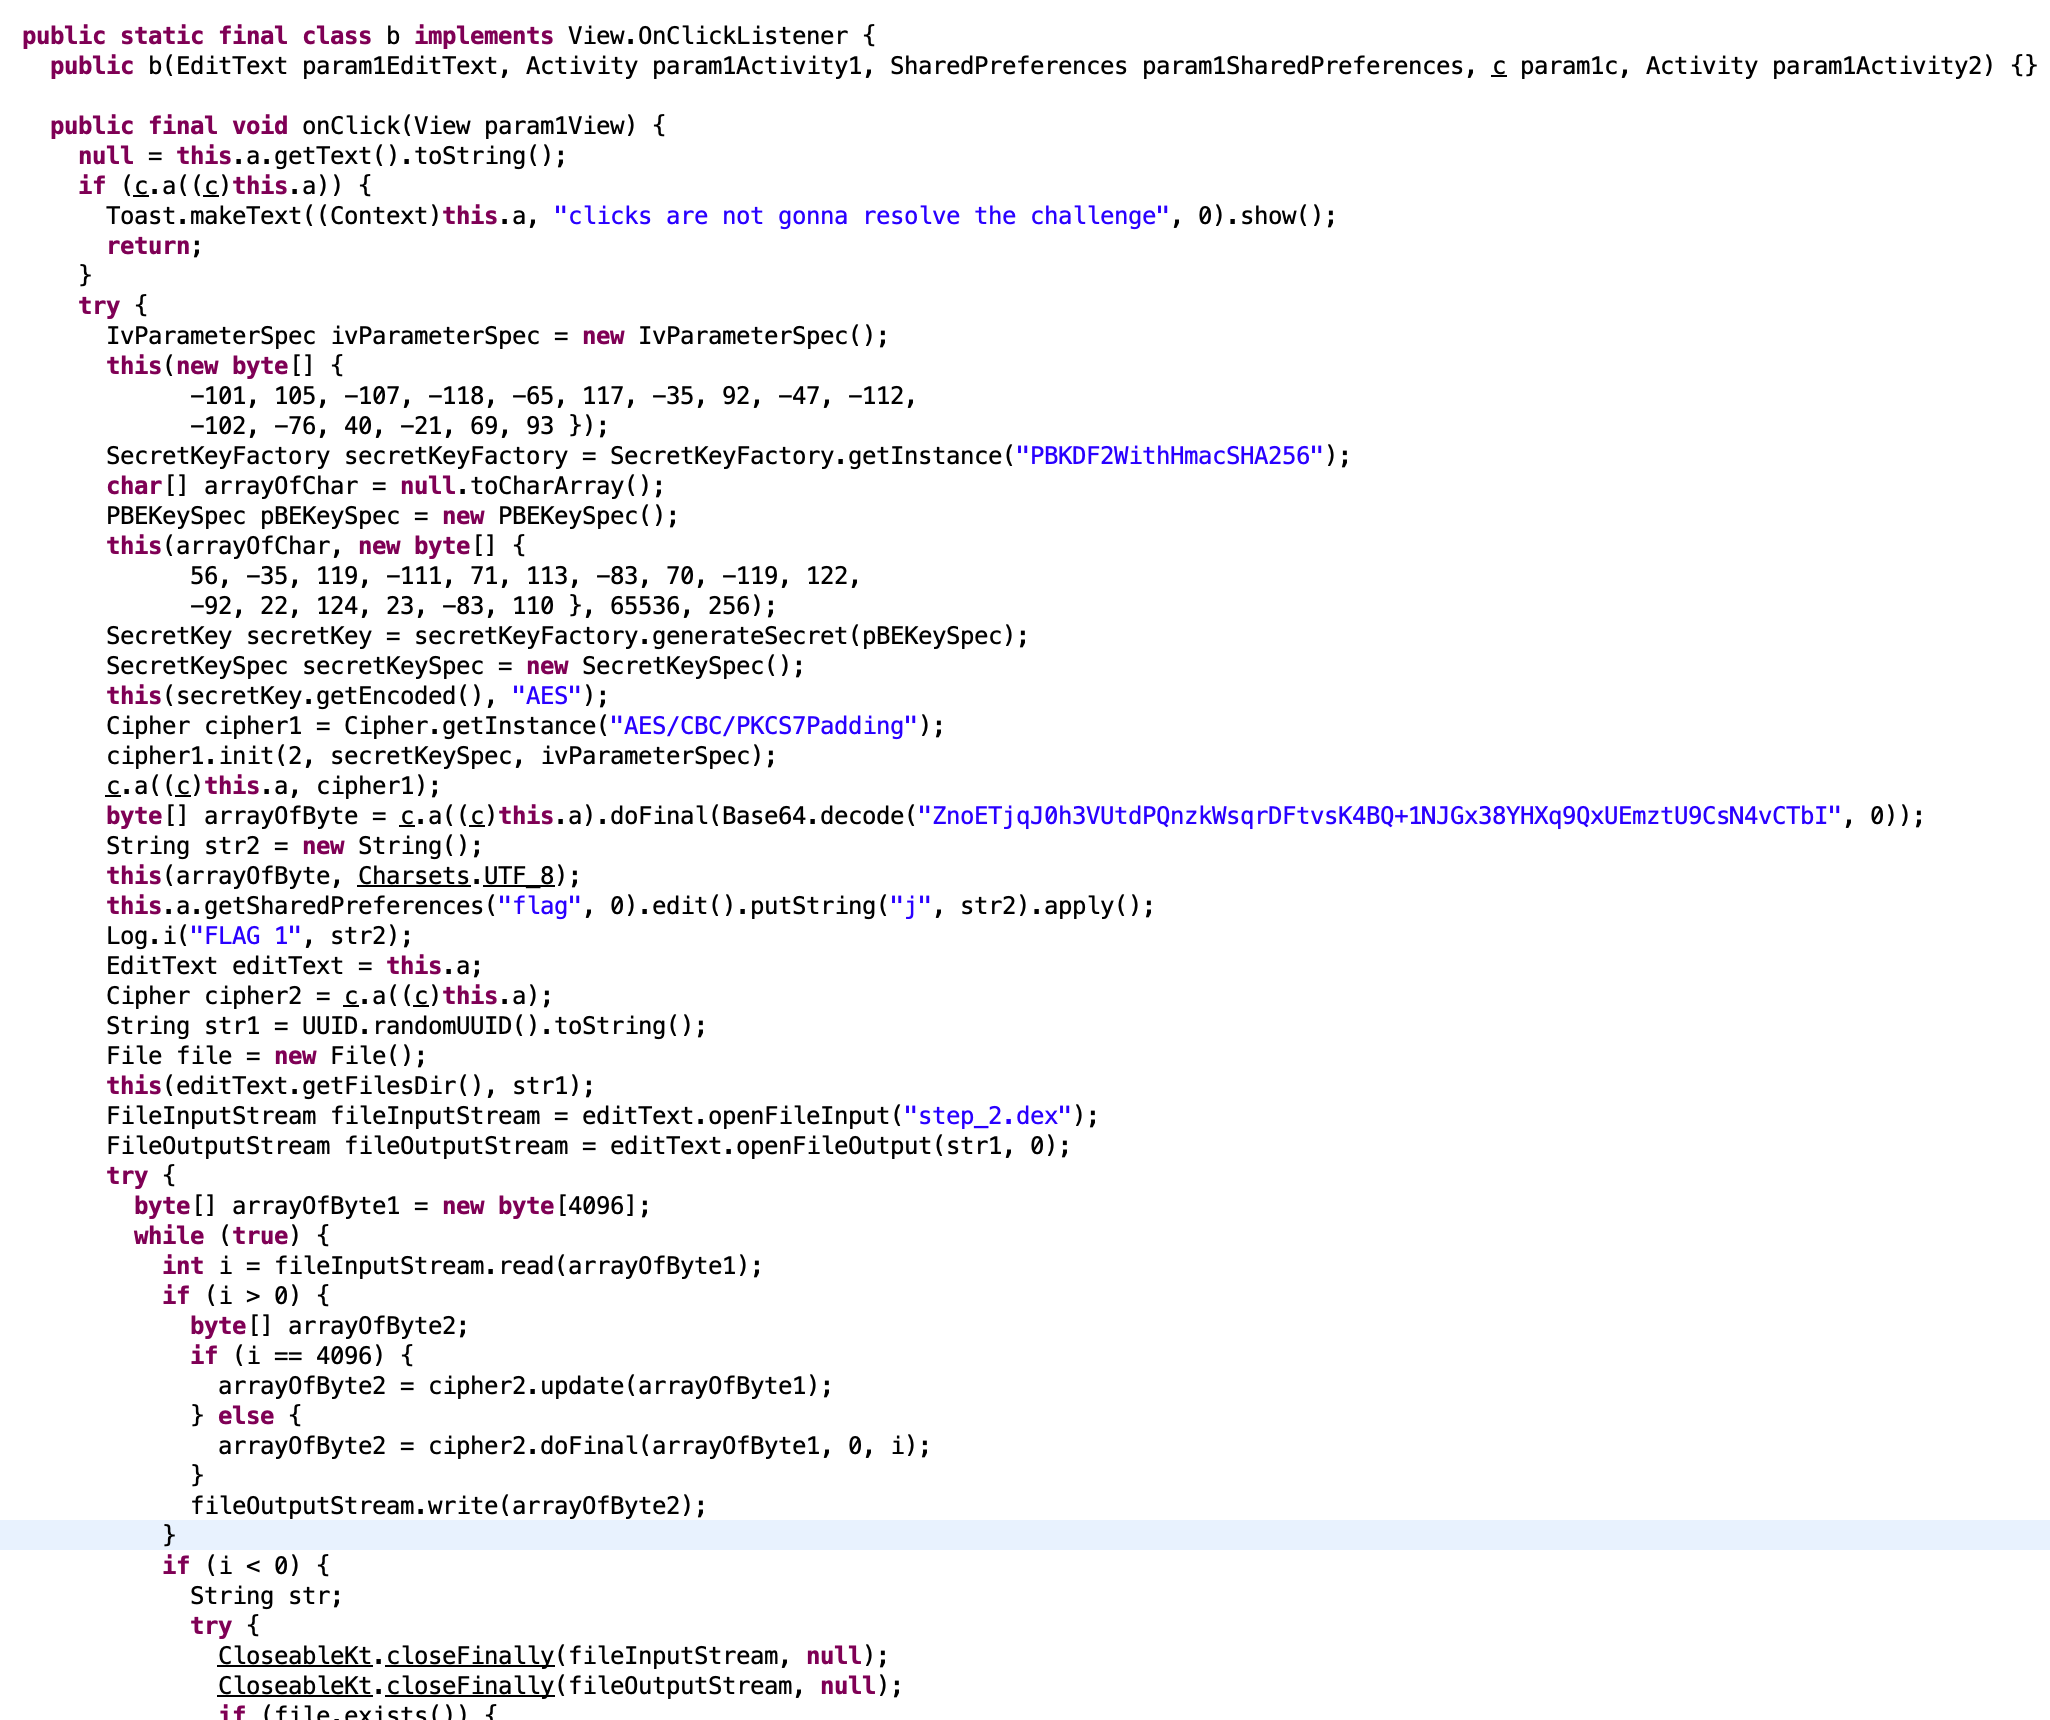
As you can see, this is the same process but this time we have to enter a password that is used to decrypt the first flag and the step_2.dex using AES.
Because AES is really robust, we cannot guess the password. But we have a string containing password.txt
By investigating deeper the other class, we understand that 4 checks need to pass. And each check is going to complete the password.txt file. So, if we pass the 4 checks, we should be able to use this password to decrypt the flag 1 and the next step.
Here are the 4 checks (no captures so trust me one this one) :
- The class
a.a.a.e.fchecks thatro.debuggableis set to0andro.secureis set to1; - The class
a.a.a.e.echecks that files"su", "magisk", "magiskhide", "magiskinit", "magiskpolicy"aren’t stored on the system (using thePATHenvironnement variable) ; - The class
a.a.a.e.dchecks some CRC of resources files and also if some packages are installed under/system/priv-app; - The class
a.a.a.e.cchecks that files"/system/app/Superuser.apk", "/system/etc/init.d/99SuperSUDaemon", "/dev/com.koushikdutta.superuser.daemon/", "/system/xbin/daemonsu", "/sbin/su", "/system/bin/su", "/system/bin/failsafe/su", "/system/xbin/su", "/system/xbin/busybox", "/system/sd/xbin/su", "/data/local/su", "/data/local/xbin/su", "/data/local/bin/su"aren’t stored on the system.
After some research, this seems to be a way to ensure that the device is not rooted.
To bypass every check, let’s use the power of frida once again.
I used a script made by @dzonerzy and made few modifications to add missing files ("frida-server","re.frida.server","99SuperSUDaemon","Superuser.apk").
This script hooks multiples functions to hide binaries, properties etc. Basically, when something matches one of his variables, it replaces it by something unavailable or invalid so the hooked function will return an error.
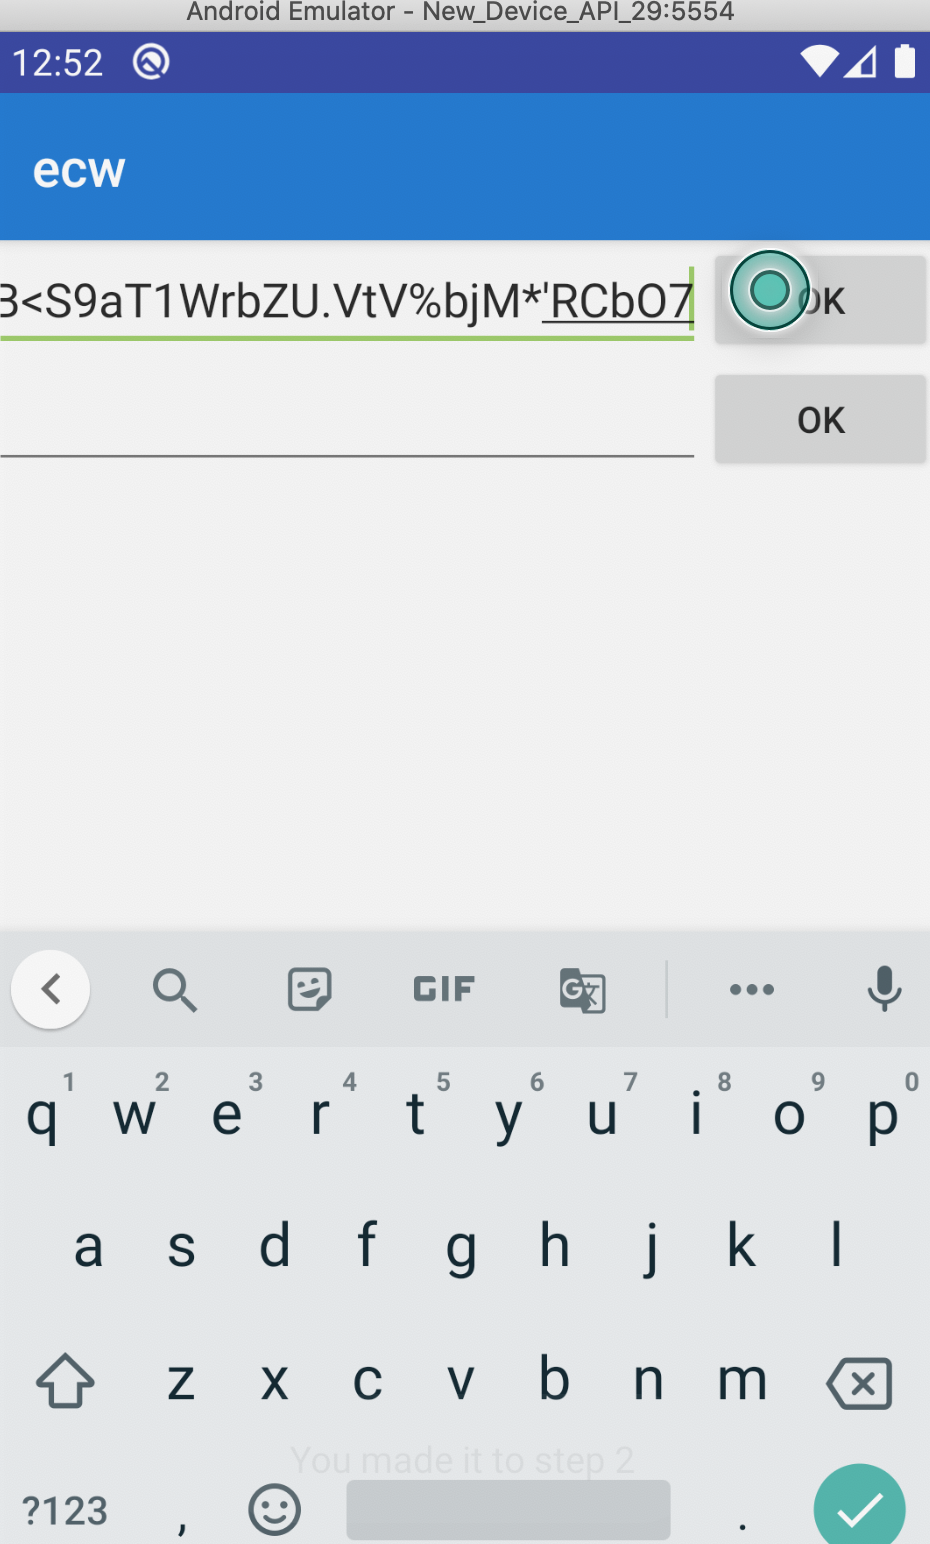
We relaunch the app using frida, then we go check the content of /data/user/0/com.example.ecw/files/password.txt.
generic_x86:/ # cd /data/user/0/com.example.ecw/
generic_x86:/data/user/0/com.example.ecw # cd files
generic_x86:/data/user/0/com.example.ecw/files # cat password.txt
password_for_step1_is:py5B<S9aT1WrbZU.VtV%bjM*'RCbO7
generic_x86:/data/user/0/com.example.ecw/files #
generic_x86:/data/user/0/com.example.ecw/files #
We enter this password in the text field, click on the button and obtain a You made it to step 2
Checking the logcat will give us the first flag:
2020-10-24 12:52:42.978 22175-22175/com.example.ecw I/FLAG 1: ECW_oe8%jXffkWul&#!V@tqB(:V%WP?JUKm@I(2KqIfv
Solving step 2
Because our hook to unlink wrapper is still enabled, the decrypted step_2.dex file should be present under the same directory.
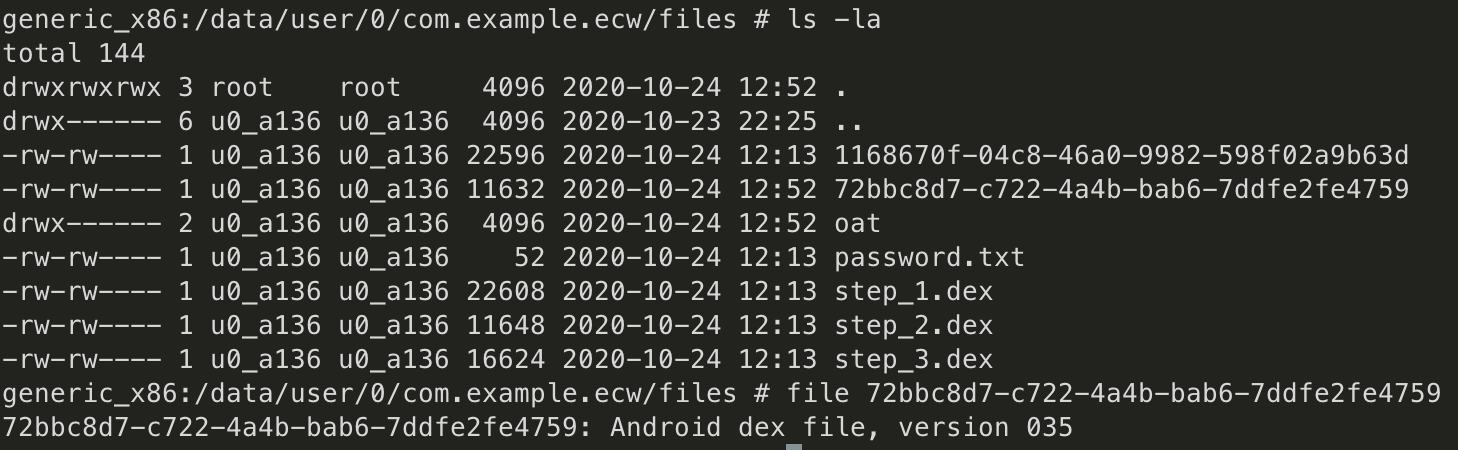
We have a new file name 72bbc8d7-c722-4a4b-bab6-7ddfe2fe4759
Same steps as previously:
- Downloading the file ;
- Using dex2jar ;
- Opening it in jd-gui ;
- Checking the code.
This is exactly the same pattern. The second flag and the step_3.dex are decrypted using a password. The password is checked in another class:
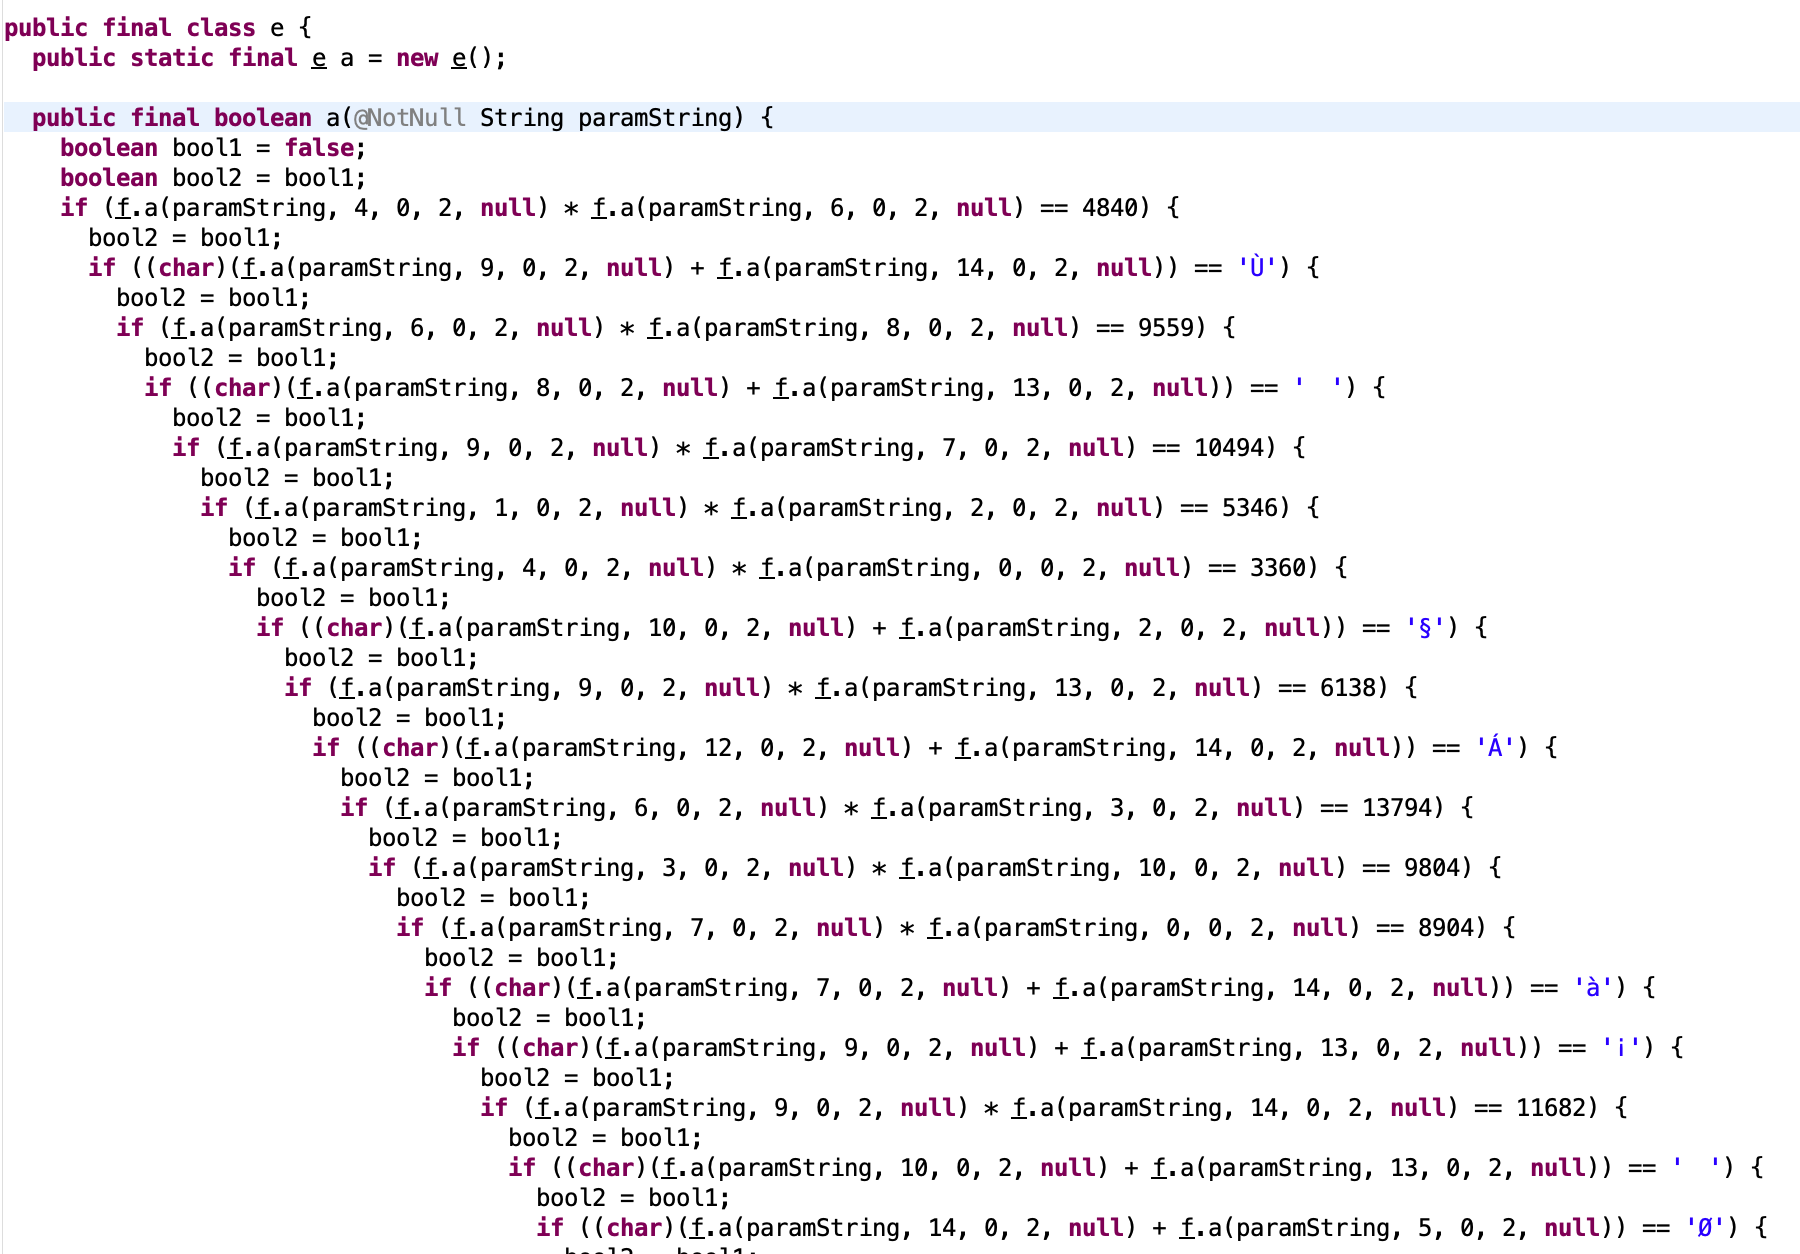
Here, f.a(paramString, i, 0, 2, null) represents password[i] interpreted as an integer where password is our input. So, we have to solve every equation (which are sometimes interdepent).
No maths needed to do this, let’s just use a SAT solver called Z3 developped by Microsoft.
from z3 import *

def main():
    inp = IntVector('inp', 16)
    s = Solver()

    s.add(inp[4] * inp[6] == 4840)
    s.add(inp[9] + inp[14] == 217)
    s.add(inp[6] * inp[8] == 9559)
    s.add(inp[8] + inp[13] == 141)
    s.add(inp[9] * inp[7] == 10494)
    s.add(inp[1] * inp[2] == 5346)
    s.add(inp[4] * inp[0] == 3360)
    s.add(inp[10] + inp[2] == 167)
    s.add(inp[9] * inp[13] == 6138)
    s.add(inp[12] + inp[14] == 193)
    s.add(inp[6] * inp[3] == 13794)
    s.add(inp[3] * inp[10] == 9804)
    s.add(inp[7] * inp[0] == 8904)
    s.add(inp[7] + inp[14] == 224)
    s.add(inp[9] + inp[13] == 161)
    s.add(inp[9] * inp[14] == 11682)
    s.add(inp[10] + inp[13] == 148)
    s.add(inp[14] + inp[5] == 216)
    s.add(inp[4] + inp[6] == 161)
    s.add(inp[6] + inp[2] == 202)
    s.add(inp[9] * inp[8] == 7821)
    s.add(inp[14] * inp[5] == 11564)
    s.add(inp[9] * inp[4] == 3960)
    s.add(inp[4] + inp[8] == ord('w'))
    s.add(inp[6] + inp[3] == 235)
    s.add(inp[6] * inp[2] == 9801)
    s.add(inp[0] + inp[10] == 170)
    s.add(inp[7] * inp[10] == 9116)
    s.add(inp[7] + inp[10] == 192)
    s.add(inp[6] + inp[8] == 200)
    s.add(inp[11] * inp[1] == 6468)
    s.add(inp[9] + inp[8] == 178)
    s.add(inp[2] + inp[14] == 199)
    s.add(inp[7] + inp[0] == 190)
    s.add(inp[8] * inp[5] == 7742)
    s.add(inp[15] * inp[13] == 7316)
    s.add(inp[10] * inp[13] == 5332)
    s.add(inp[8] * inp[13] == 4898)
    s.add(inp[6] + inp[14] == 239)
    s.add(inp[8] + inp[5] == 177)
    s.add(inp[1] * inp[4] == 2640)
    s.add(inp[0] + inp[3] == 198)
    s.add(inp[11] + inp[1] == 164)
    s.add(inp[10] * inp[2] == 6966)
    s.add(inp[0] * inp[3] == 9576)
    s.add(inp[12] * inp[14] == 8850)
    s.add(inp[6] * inp[14] == 14278)
    s.add(inp[0] * inp[10] == 7224)
    s.add(inp[2] * inp[14] == 9558)
    s.add(inp[9] + inp[7] == 205)
    s.add(inp[8] + inp[0] == 163)
    s.add(inp[15] + inp[13] == 180)
    s.add(inp[1] + inp[4] == ord('j'))
    s.add(inp[8] * inp[0] == 6636)
    s.add(inp[4] * inp[8] == 3160)
    s.add(inp[4] + inp[0] == ord('|'))
    s.add(inp[7] * inp[14] == 12508)
    s.add(inp[3] + inp[10] == 200)
    s.add(inp[9] + inp[4] == 139)
    s.add(inp[1] + inp[2] == 147)

    print(s.check())
    m = s.model()
    print(''.join([chr(m.evaluate(x).as_long()) for x in inp]))


if __name__ == "__main__":
    main()
Se we initialize an int vector and add every constraint to solve the system. Then we verify that it’s a SAT problem and print the solution which gives us:
TBQr(byjOcVbK>vv
At this point, I used the password and went to fast to the step 3. But I forgot to check out some classes:
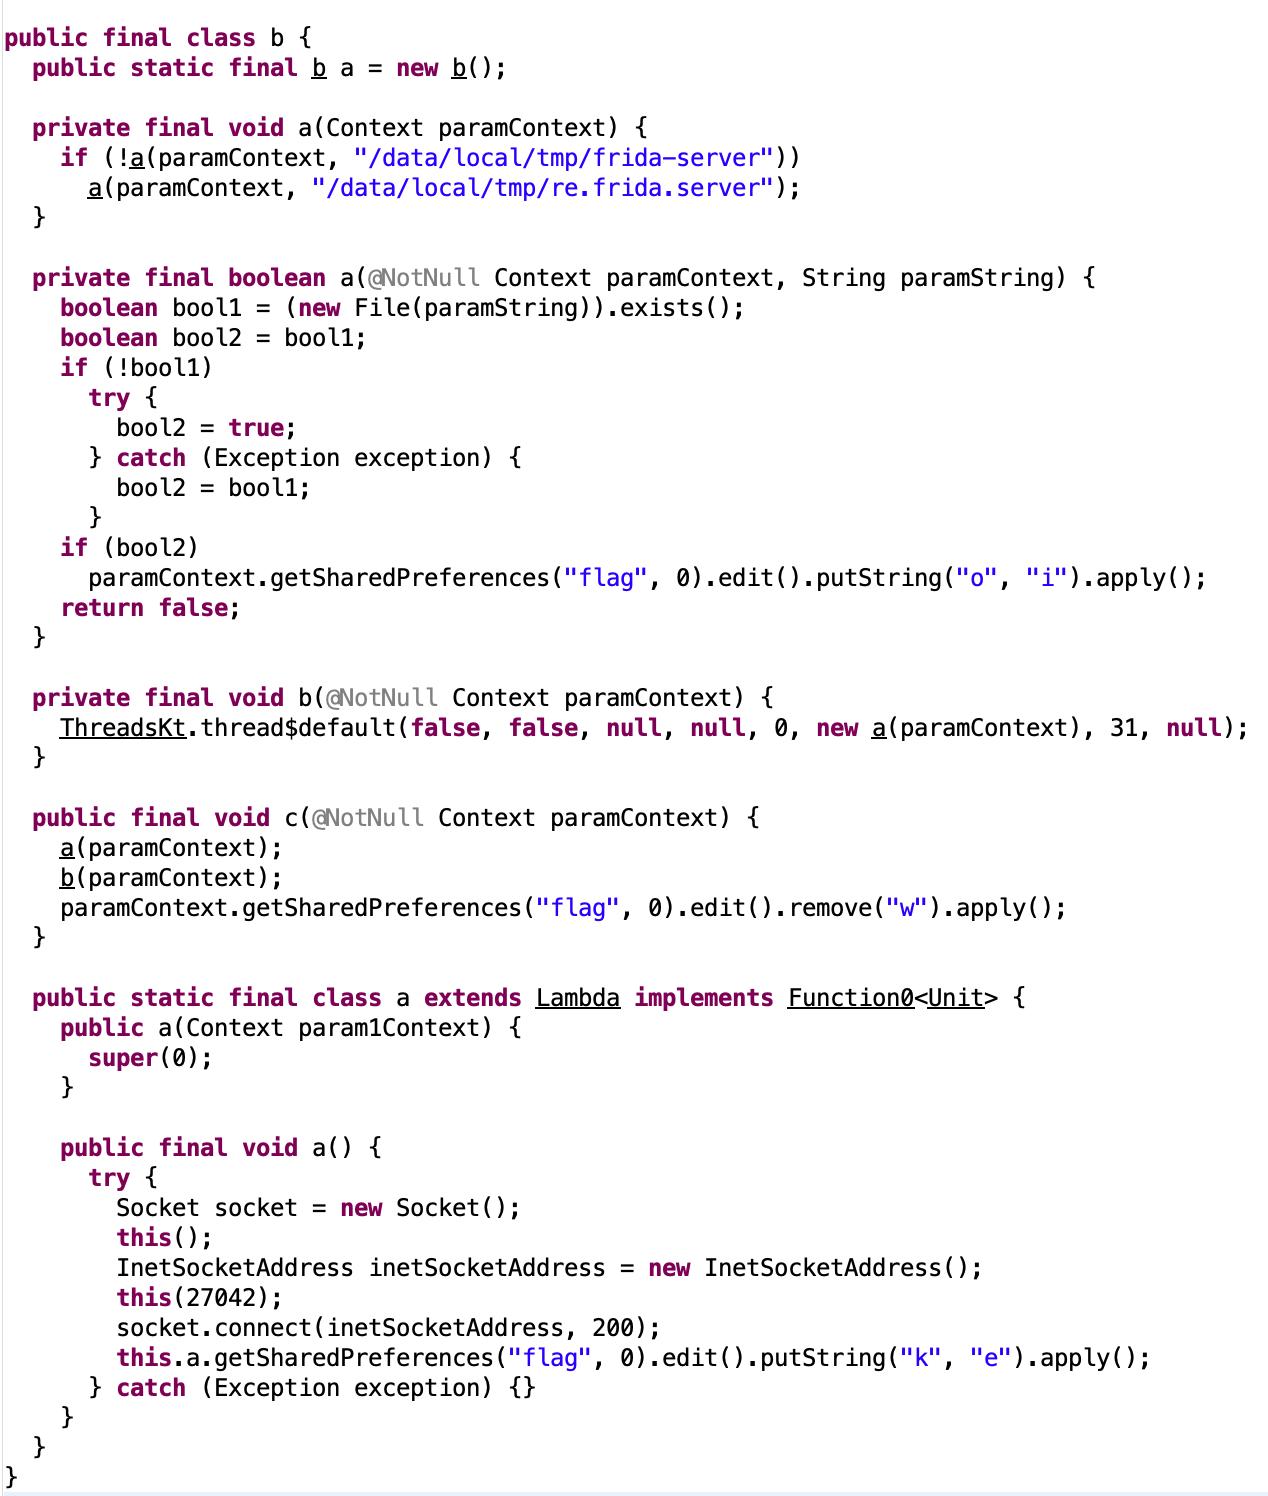
As you can see, if /data/local/tmp/frida-server or /data/local/tmp/re.frida-server exist, a character will be added to the flag shared preference. Same thing for the socket which check the default frida port.
The issue here is that in the last step, the flag preferences will be used to generate a part of the password. Because I didn’t take care of these checks in the first place, I wasn’t able to validate the last step and had to restart from the beginning to see what piece was missing.
Our actual hooks implemented in frida take care of the first check which means that trying to open /data/local/tmp/frida-server or /data/local/tmp/re.frida-server won’t work for the app even if these files exist.
However, we need to add another hook to force the socket connect method to send back an error.
This is what I did:
var target = Java.use("java.net.Socket");
    target.connect.overload('java.net.SocketAddress', 'int').implementation = function(socketAddr, timeout) {
    console.log("Bypass socket connect");
    return  this.connect(null, timeout);
};
Basically, trying to connect using a null InetSocketAddres will result in an Exception being triggered so we’ll directly go to the catch expression without executing this.a.getSharedPreferences("flag", 0).edit().putString("k", "e").apply();.
At this point we’re ready to go to step 3, let’s use the password and get the second flag.
Checking the logcat will give us the second flag:
2020-10-24 16:20:05.757 27729-27729/com.example.ecw I/FLAG 2: ECW_AIU/yMZg3c7(NqGyqu8Iv3j8Oszx+1<>i'7&o(9g
Solving step 3
Because our hook to unlink wrapper is still enabled, the decrypted step_3.dex file should be present under the same directory.
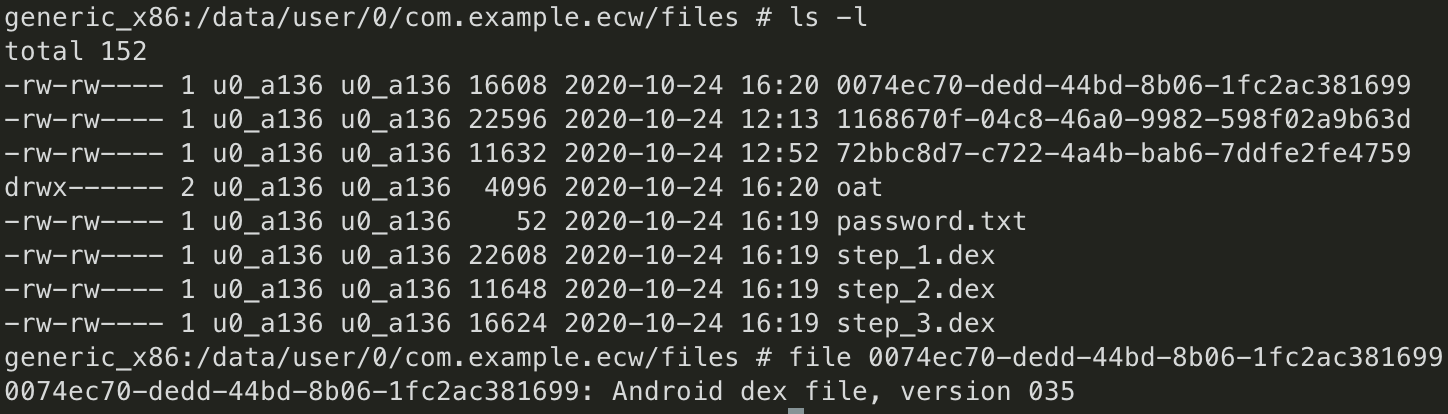
We have a new file name 0074ec70-dedd-44bd-8b06-1fc2ac381699
Same steps as previously:
- Downloading the file ;
- Using dex2jar ;
- Opening it in jd-gui ;
- Checking the code.
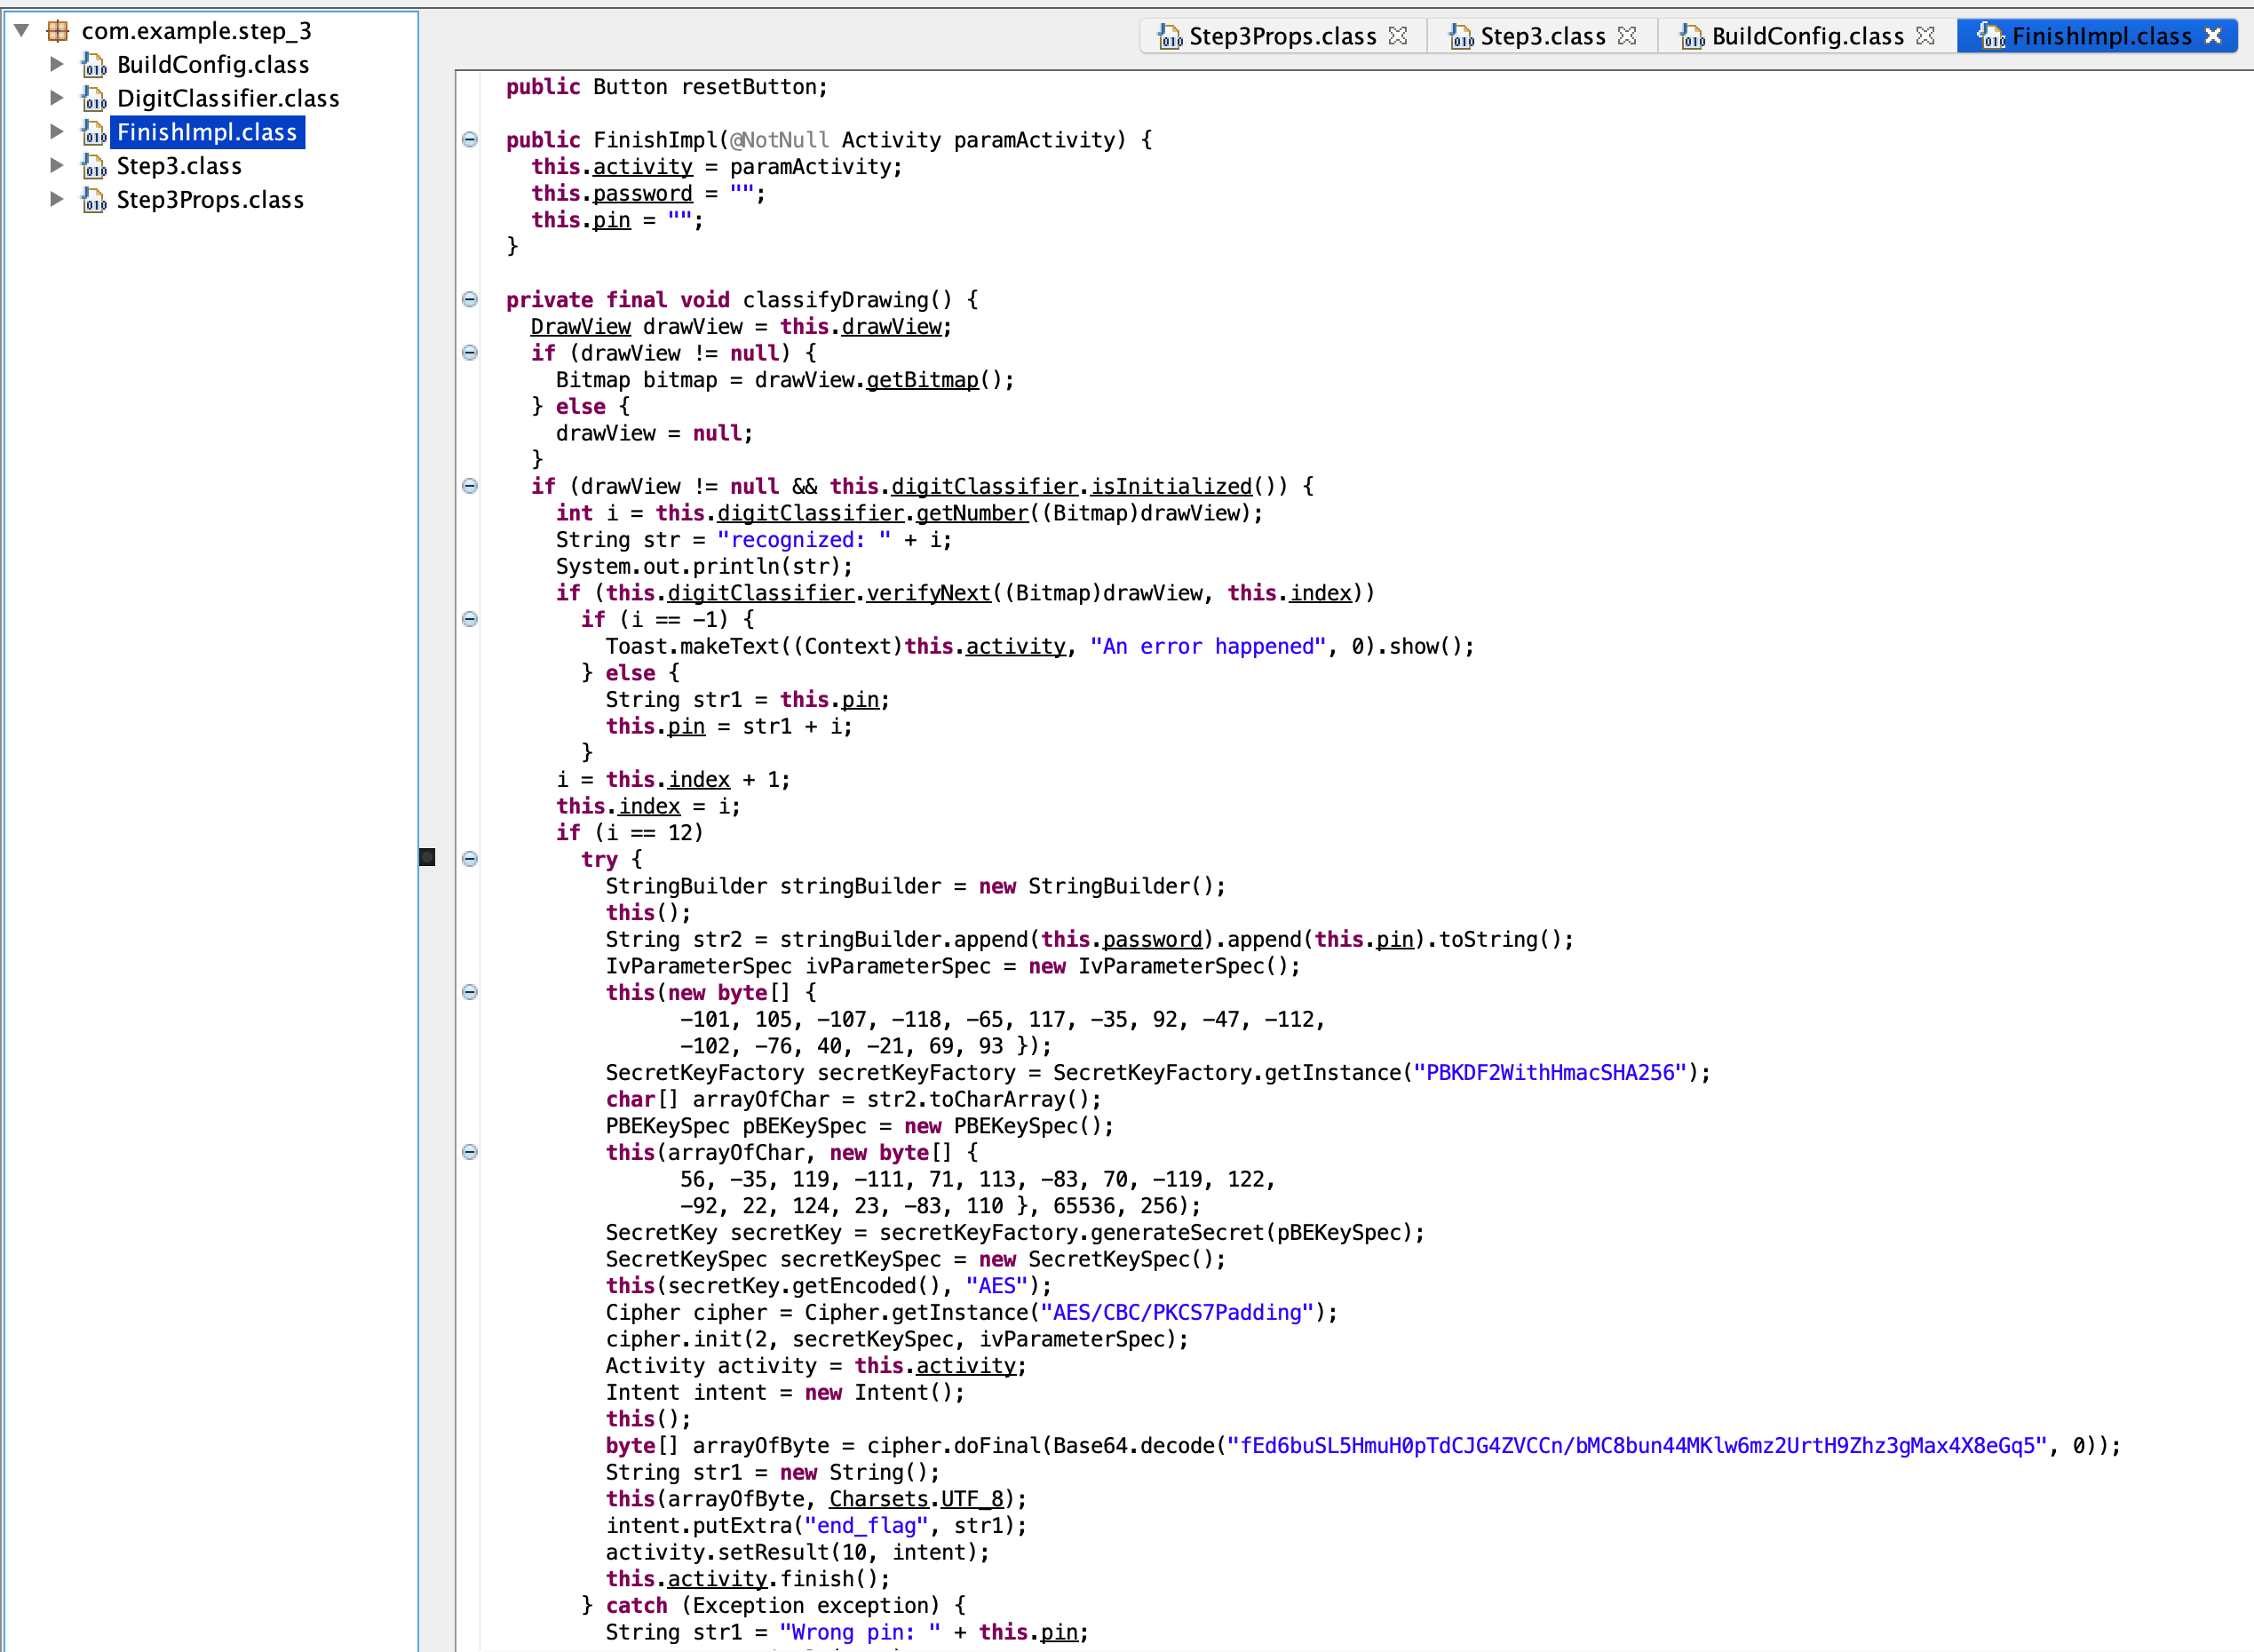
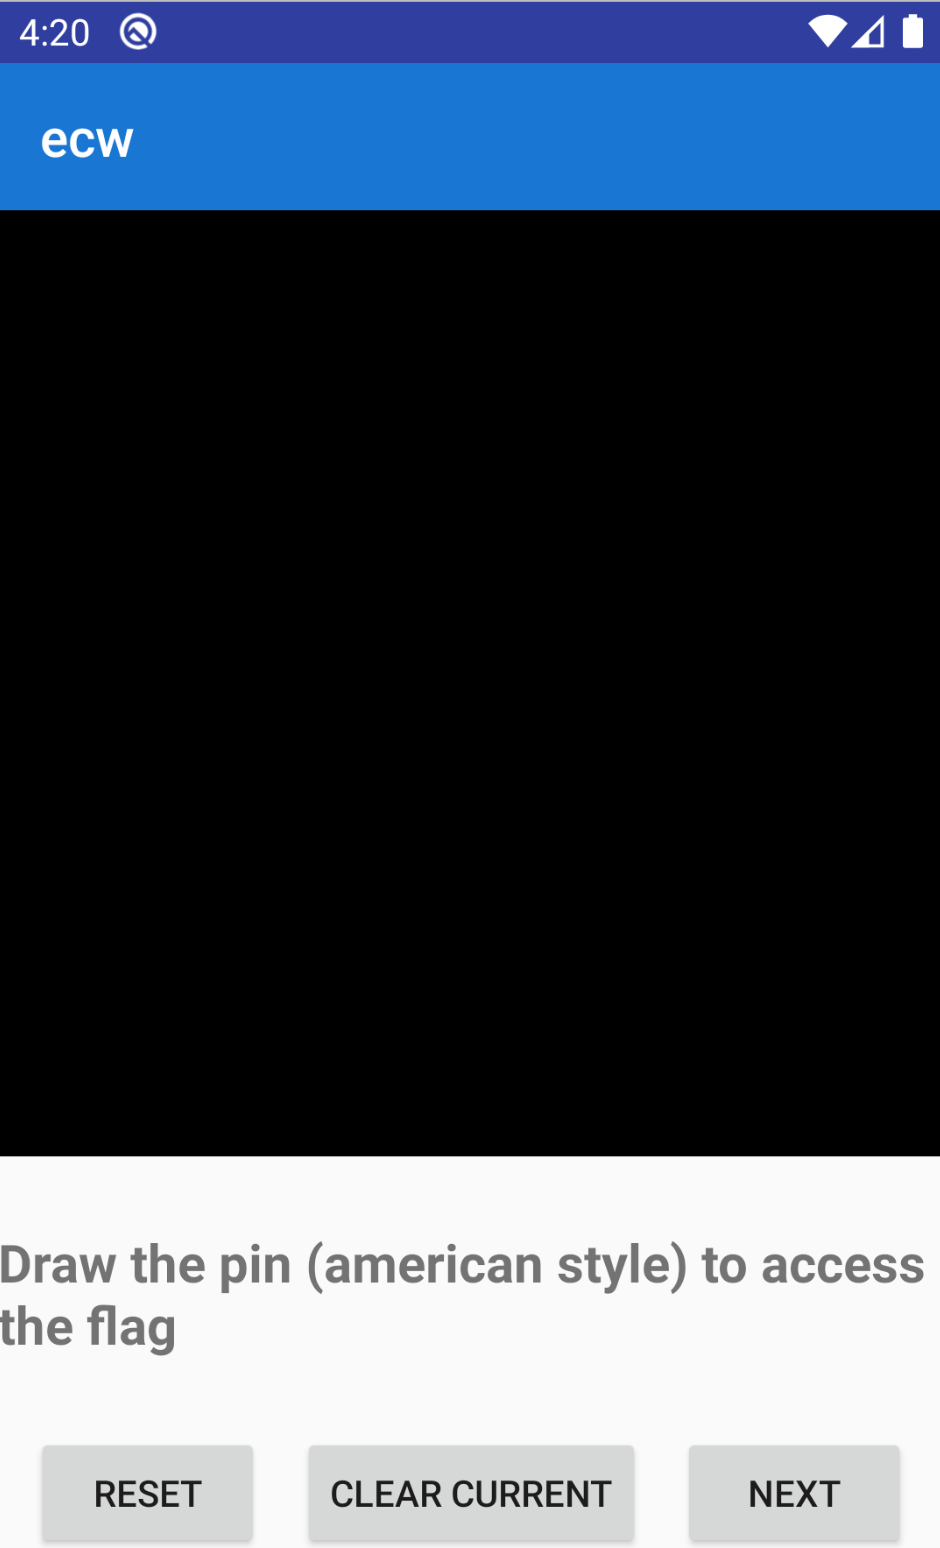
As you can see, same pattern except we have to enter a PIN composed of 12 digits.
This PIN is appended to a password which is calculated using the data stored in the shared preferences.
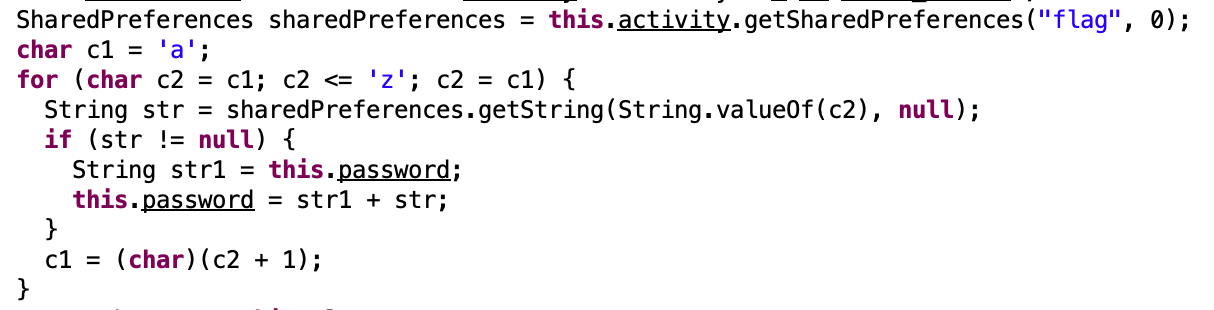
Here’s what the flag shared preferences looks like:
<?xml version='1.0' encoding='utf-8' standalone='yes' ?>
<map>
<string name="a">LuKXSGlN5(%:Vk=alEbl9khIEPBo=mXu;hR7Ez7E</string>
<string name="q">ECW_AIU/yMZg3c7(NqGyqu8Iv3j8Oszx+1<>i'7&o(9g</string>
<string name="j">ECW_oe8%jXffkWul&#!V@tqB(:V%WP?JUKm@I(2KqIfv</string>
</map>
If you missed some checks, you would’ve something like that :
<?xml version='1.0' encoding='utf-8' standalone='yes' ?>
<map>
<string name="a">LuKXSGlN5(%:Vk=alEbl9khIEPBo=mXu;hR7Ez7E</string>
<string name="q">ECW_AIU/yMZg3c7(NqGyqu8Iv3j8Oszx+1<>i'7&o(9g</string>
<string name="j">ECW_oe8%jXffkWul&#!V@tqB(:V%WP?JUKm@I(2KqIfv</string>
<string name="k">e</string>
<string name="o">i</string>
</map>
Like I was saying earlier, the password would not be correct so you wouldn’t be able to get the last flag even with the good PIN.
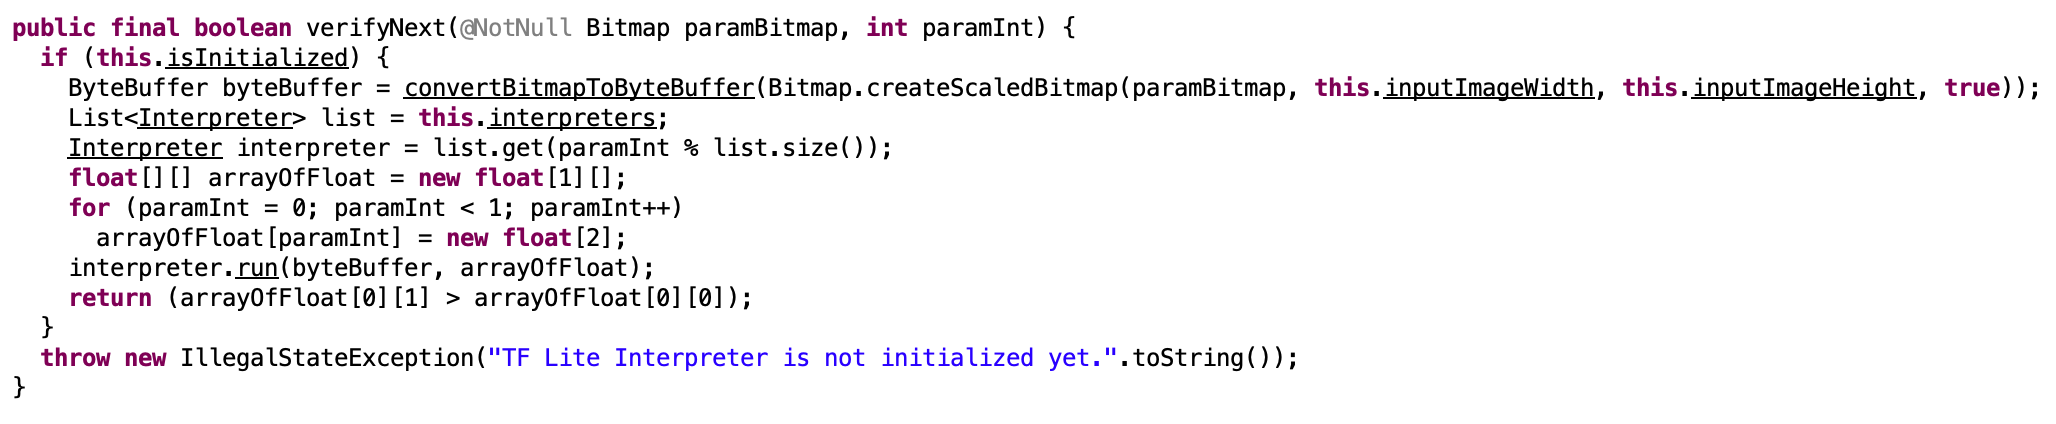
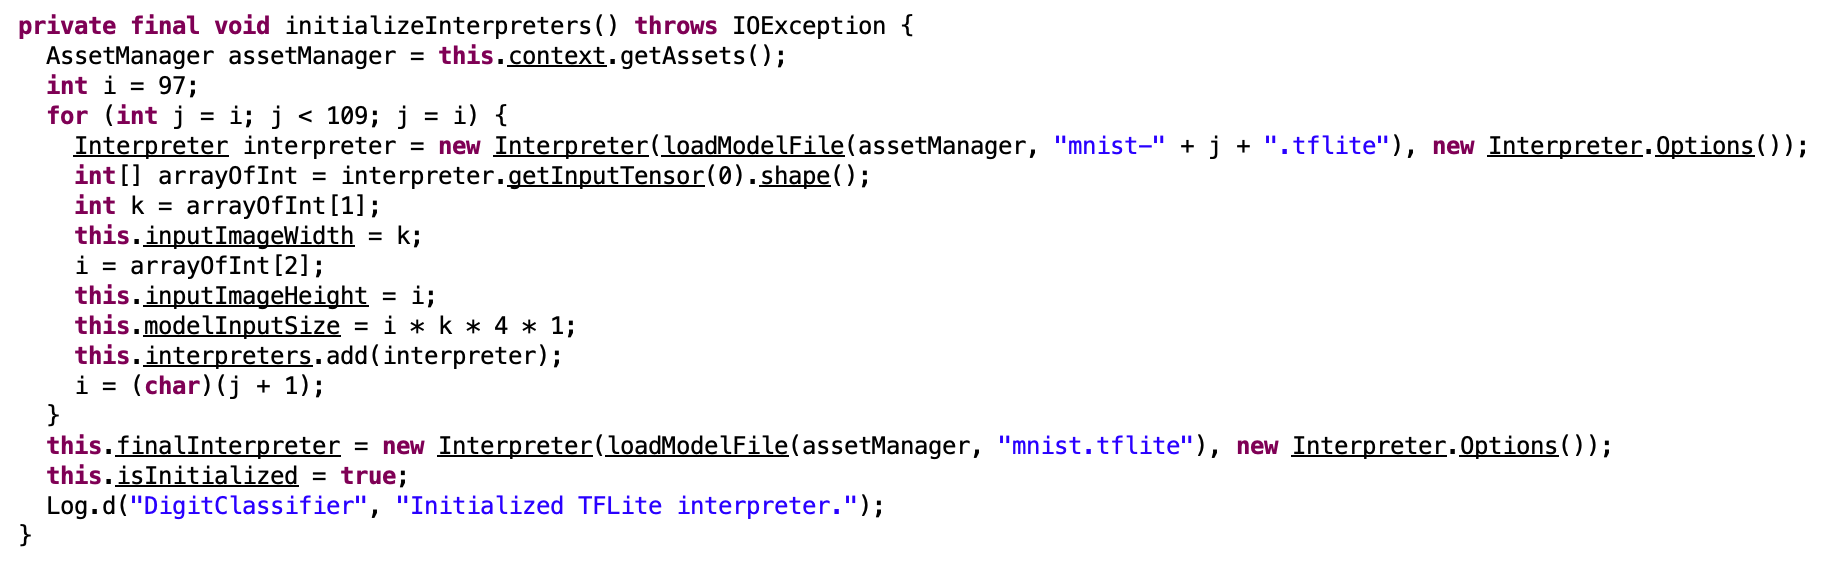
Now let’s study the PIN part. To enter the PIN, we have to draw each digit. Then a DigitClassifier uses some generated models and Tensorflow library to find the corresponding integer.
Looking further at the code, we understand that there are 2 different methods (getNumber() and verifyNext()).
The getNumber() method uses a mnist.tflite model to classify the digit. Then the digit is added to the PIN depending on the verifyNext() value.
The verifyNext()method is very similar to getNumber()except it uses a different model depending on the digit index in the PIN.
Here’s the verifyNext() method:
And here’s the models loading method:
Since I’m a noob in AI, I RTFM on how to train and use a digit classifier using the mnist dataset.
Basically, I wanted to test every model and check the accuracy. To do this I used python:
import tensorflow as tf
from tensorflow import keras
import numpy as np

mnist = keras.datasets.mnist
(train_images, train_labels), (test_images, test_labels) = mnist.load_data()

test_images = test_images / 255.0

def evaluate(tflite_model):
    interpreter = tf.lite.Interpreter(model_path=tflite_model)
    interpreter.allocate_tensors()
    input_tensor_index = interpreter.get_input_details()[0]["index"]
    output = interpreter.tensor(interpreter.get_output_details()[0]["index"])

    prediction_digits = []
    for test_image in test_images:
        test_image = np.expand_dims(test_image, axis=0).astype(np.float32)
        interpreter.set_tensor(input_tensor_index, test_image)

        interpreter.invoke()

        digit = np.argmax(output()[0])
        prediction_digits.append(digit)

    accurate_count = 0
    for index in range(len(prediction_digits)):
        if prediction_digits[index] == test_labels[index]:
            accurate_count += 1
    accuracy = accurate_count * 1.0 / len(prediction_digits)

    print('Float model accuracy = %.4f' % accuracy)
    return accuracy

if __name__ == "__main__":
    models = ["mnist.tflite"] + [f"mnist-{i}.tflite" for i in "abcdefghijkl"]
    for m in models:
        print(f"[{m.upper()}]")
        main(f"assets/{m}")
And here’s the output:
[MNIST.TFLITE]
Float model accuracy = 0.9881
[MNIST-A.TFLITE]
Float model accuracy = 0.0980
[MNIST-B.TFLITE]
Float model accuracy = 0.2105
[MNIST-C.TFLITE]
Float model accuracy = 0.0980
[MNIST-D.TFLITE]
Float model accuracy = 0.0980
[MNIST-E.TFLITE]
Float model accuracy = 0.0982
[MNIST-F.TFLITE]
Float model accuracy = 0.0981
[MNIST-G.TFLITE]
Float model accuracy = 0.0980
[MNIST-H.TFLITE]
Float model accuracy = 0.0025
[MNIST-I.TFLITE]
Float model accuracy = 0.0981
[MNIST-J.TFLITE]
Float model accuracy = 0.0979
[MNIST-K.TFLITE]
Float model accuracy = 0.0980
[MNIST-L.TFLITE]
Float model accuracy = 0.0979
The only model that seems accurate is the mnist.tflite which is used in getNumber().
Let’s check the test in details for the mnist-a.tflite model.
To do this, I’ve added print(f"Model prediction : {prediction_digits[index]} - Label : " f"{test_labels[index]}") to the second loop of the evaluate() function.
Here is a part of the results:
Model prediction : 1 - Label : 3
Model prediction : 0 - Label : 6
Model prediction : 0 - Label : 8
Model prediction : 0 - Label : 7
Model prediction : 0 - Label : 1
Model prediction : 0 - Label : 5
Model prediction : 0 - Label : 2
Model prediction : 0 - Label : 4
Model prediction : 0 - Label : 9
Model prediction : 0 - Label : 4
Model prediction : 1 - Label : 3
Model prediction : 0 - Label : 6
Model prediction : 0 - Label : 4
Model prediction : 0 - Label : 1
Model prediction : 0 - Label : 7
Model prediction : 0 - Label : 2
Model prediction : 0 - Label : 6
Model prediction : 0 - Label : 5
Model prediction : 0 - Label : 0
Model prediction : 0 - Label : 1
Model prediction : 0 - Label : 2
Model prediction : 1 - Label : 3
Model prediction : 0 - Label : 4
Model prediction : 0 - Label : 5
Model prediction : 0 - Label : 6
Model prediction : 0 - Label : 7
Model prediction : 0 - Label : 8
Model prediction : 0 - Label : 9
Model prediction : 0 - Label : 0
Model prediction : 0 - Label : 1
Model prediction : 0 - Label : 2
Model prediction : 1 - Label : 3
Model prediction : 0 - Label : 4
Model prediction : 0 - Label : 5
Model prediction : 0 - Label : 6
Float model accuracy = 0.0980
The model returns a 1 where the test image is labeled 3 and 0 for every other digit. I think you know what to do next. We just have to check the 11 other models and get every labeled number returning a prediction of 1.
| Model name | Digit returning 1 |
|---|---|
| mnist-a.tf | 3 |
| mnist-b.tf | 1 |
| mnist-c.tf | 4 |
| mnist-d.tf | 6 |
| mnist-e.tf | 8 |
| mnist-f.tf | 5 |
| mnist-g.tf | 4 |
| mnist-h.tf | 0 |
| mnist-i.tf | 5 |
| mnist-j.tf | 2 |
| mnist-k.tf | 6 |
| mnist-l.tf | 2 |
We can deduce the PIN which is 314685405262.
However, when I drew the PIN it didn’t work. When checking the logcat it seemed that the mnist.tflite model recognized a number but the mnist-x.tflite did not recognize the same.
So, I downloaded a "GhostMouse" tool to record and replay mouse movements. I recorded my mouse drawing each digit that would be recognized by both models.
Then I replayed each digit following the PIN order and got the last flag.
Since it was pretty annoying and because I did not take some captures in the first place or even kept the flag, I’ll end this write up here.
Conclusion
This was an amazing challenge. It was really interesting and allowed me to play with frida which is a must to reverse android app. Each step requires different methodology and thinking to solve it. I hope you’ll learn useful things from this writeup.
--
Kn0wledge